
Sign In And Out (SISO) Overview
Feature overview
The Sign In / Sign Out (SISO) Hub in Q-Hub is a focused module for site / location management and compliance at the point of entry. It is often used as a stand-alone product (sometimes provided independently of the main Q-Hub platform), but it still pulls from your Q-Hub user list and connects tightly to Q-Hub’s forms and Read & Understood compliance features.
At its core, SISO is driven by two main concepts:
Locations (sites, buildings, sub-areas)
People (employees, contractors, visitors)
Every interaction in SISO is essentially “a person interacting with a location”, creating a log record that can be filtered, reported, and exported.
SISO is not a HR system. It’s designed to answer questions like:
Who is/was on this site?
When did they arrive and leave?
What site documentation did they read?
Which compliance tasks did they complete when attending this location?
Core concepts: locations and people
Locations
A location is usually a site or project (e.g. “Project X – Client Site”).
Locations can have:
Areas (e.g. “Building A”)
Sub-areas (e.g. “Building A – 2nd Floor”)
Each location can have:
Its own sign-in and sign-out form configuration
Site-specific documents to be read at the point of entry
Employee compliance activities that must be completed
Optional geofence rules and remote check-in settings
People
Every time someone signs in, SISO:
Captures identity using email or phone as the key identifier.
Creates a person profile on first use.
Re-uses the same profile for future sign-ins using the same email.
The People page then becomes a complete directory of everyone who has ever used SISO, including visitors, not just Q-Hub users.
Key navigation areas
SISO is organised around the following key pages:
Dashboard / Logs – High-level overview of location activity and sign-in/out logs.
People – All people who have ever signed in, with individual check-in history.
Roll Call – Emergency and broadcast messaging to people currently signed in.
Locations – Create, configure, and manage locations, kiosks, QR codes, forms, and site docs.
Reports – Dedicated reporting view of who signed in where and when.
Compliance – Configure and review compliance packs/activities linked to sign-ins.
Settings (Managers) – Control which users manage which locations.
How the feature is used
SISO is typically used by organisations who work on multiple jobs / projects at different sites (often on a client’s premises) and need to:
Record site attendance
Ensure people complete specific compliance steps when they arrive
Maintain evidence of who read which documents, and when
A typical workflow:
Create a location for a new project or site.
Configure:
Sign-in / sign-out forms
Site-specific docs
Employee compliance activities
QR codes and/or kiosk for sign-in
People sign in/out, from phone, QR scan or kiosk.
Compliance is completed as part of sign-in.
Managers monitor attendance, logs, reports, and compliance completion.
1. Feature concept
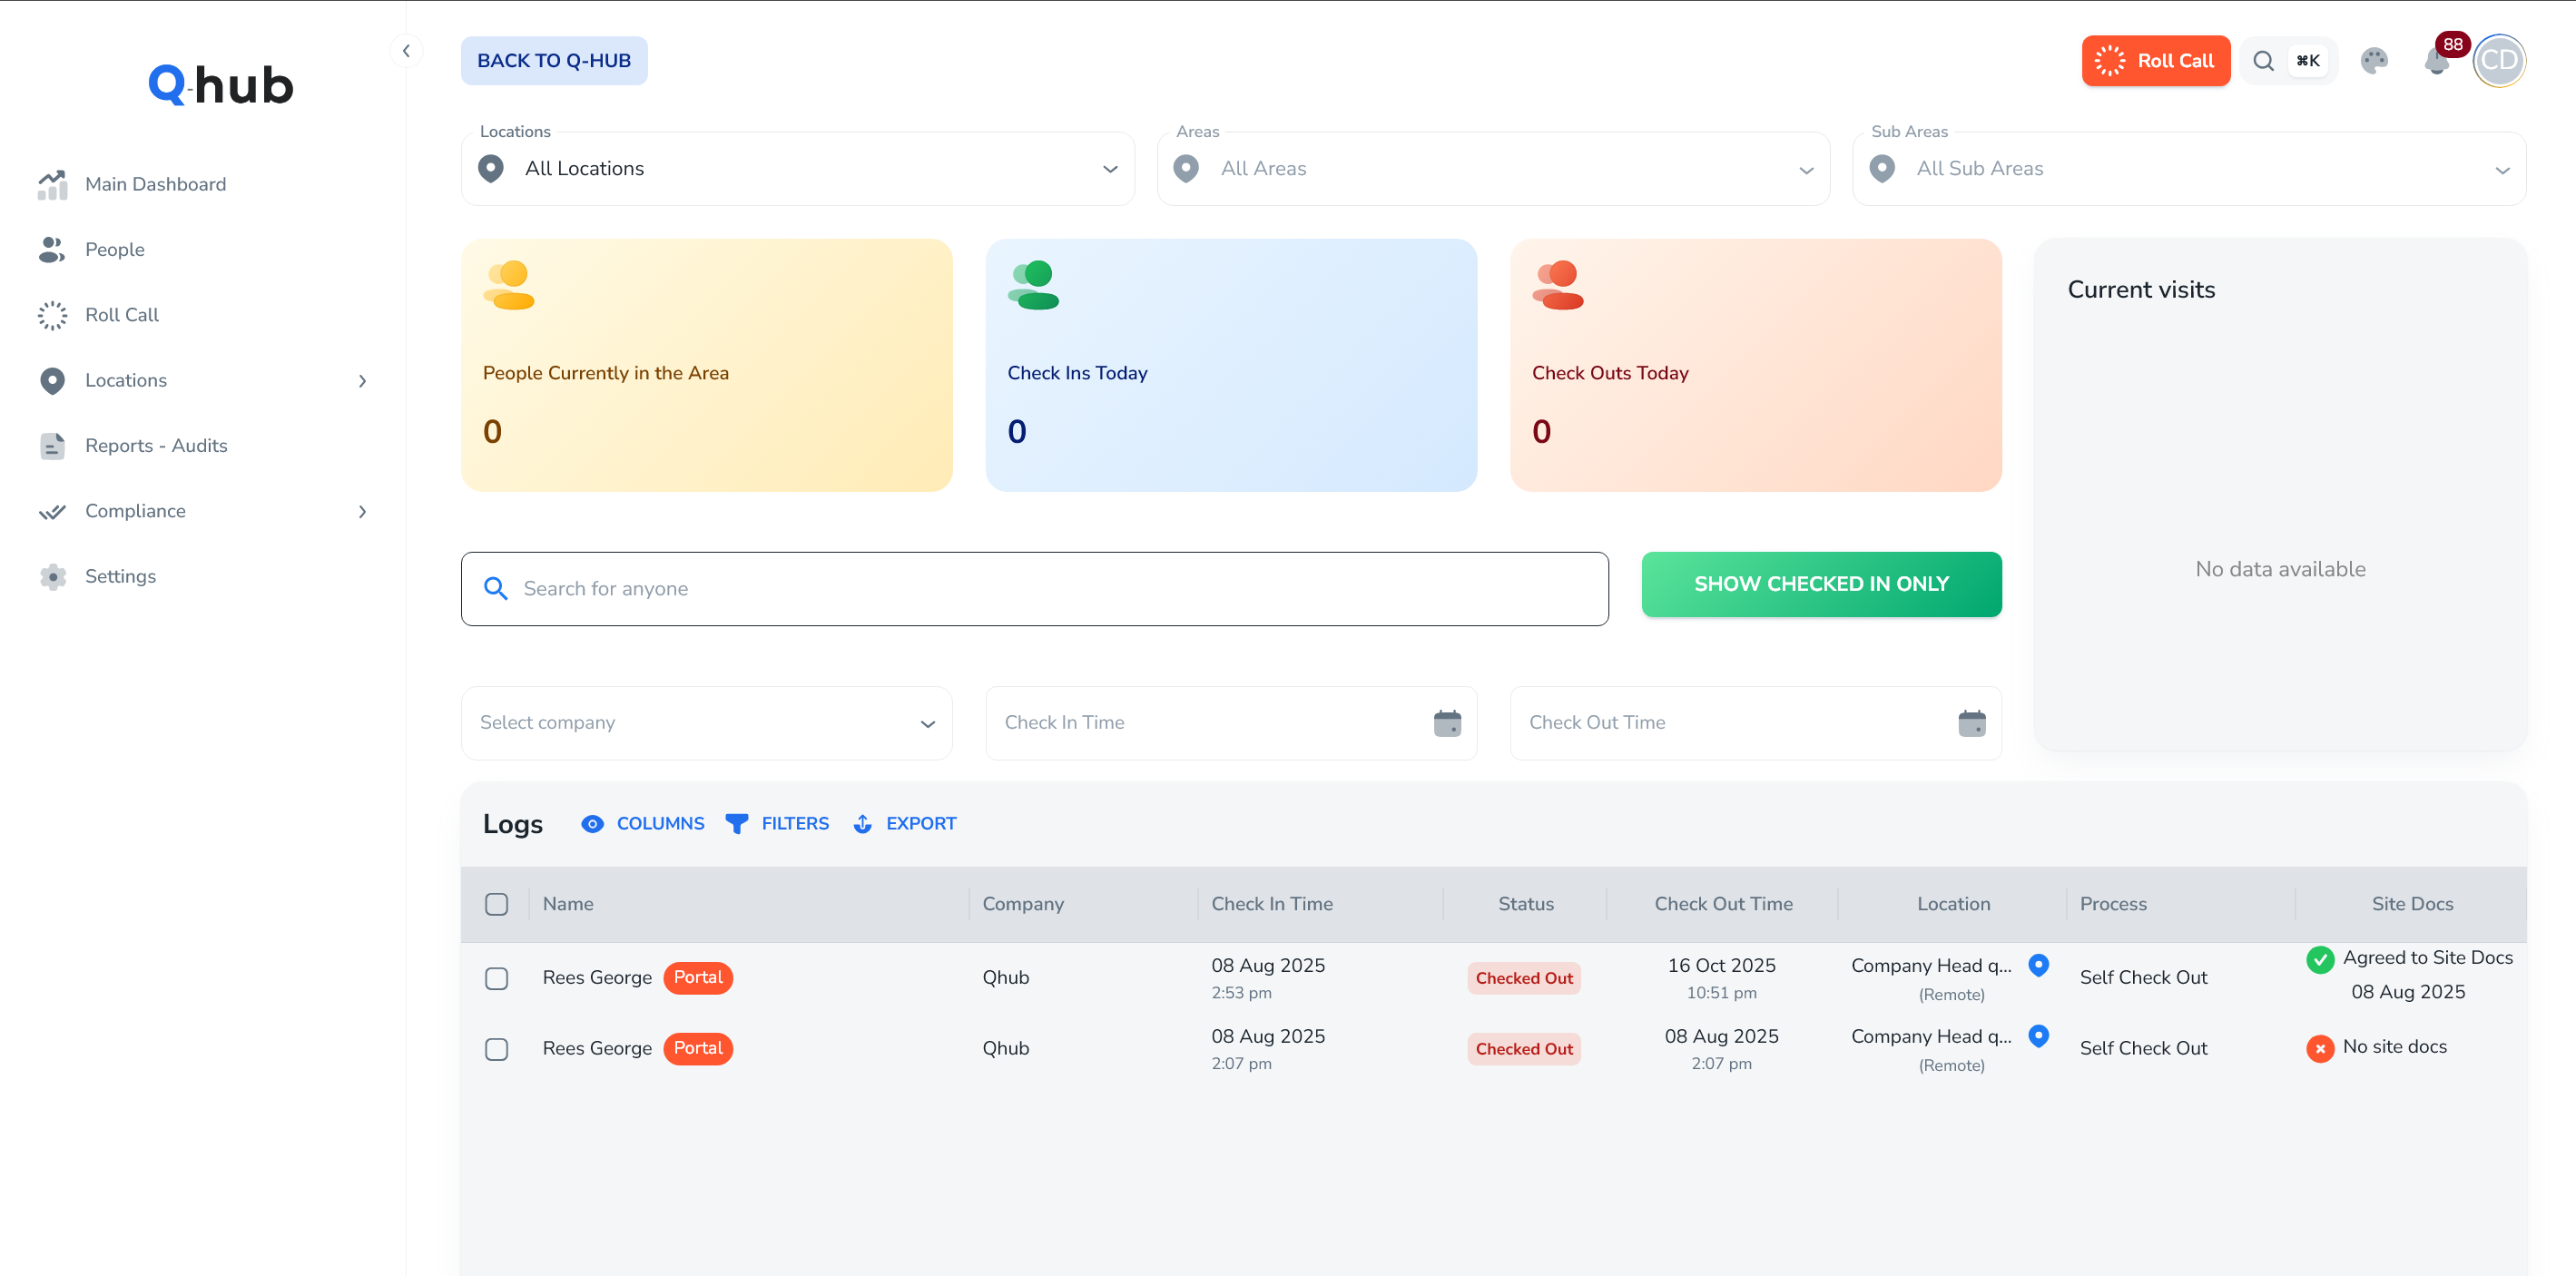
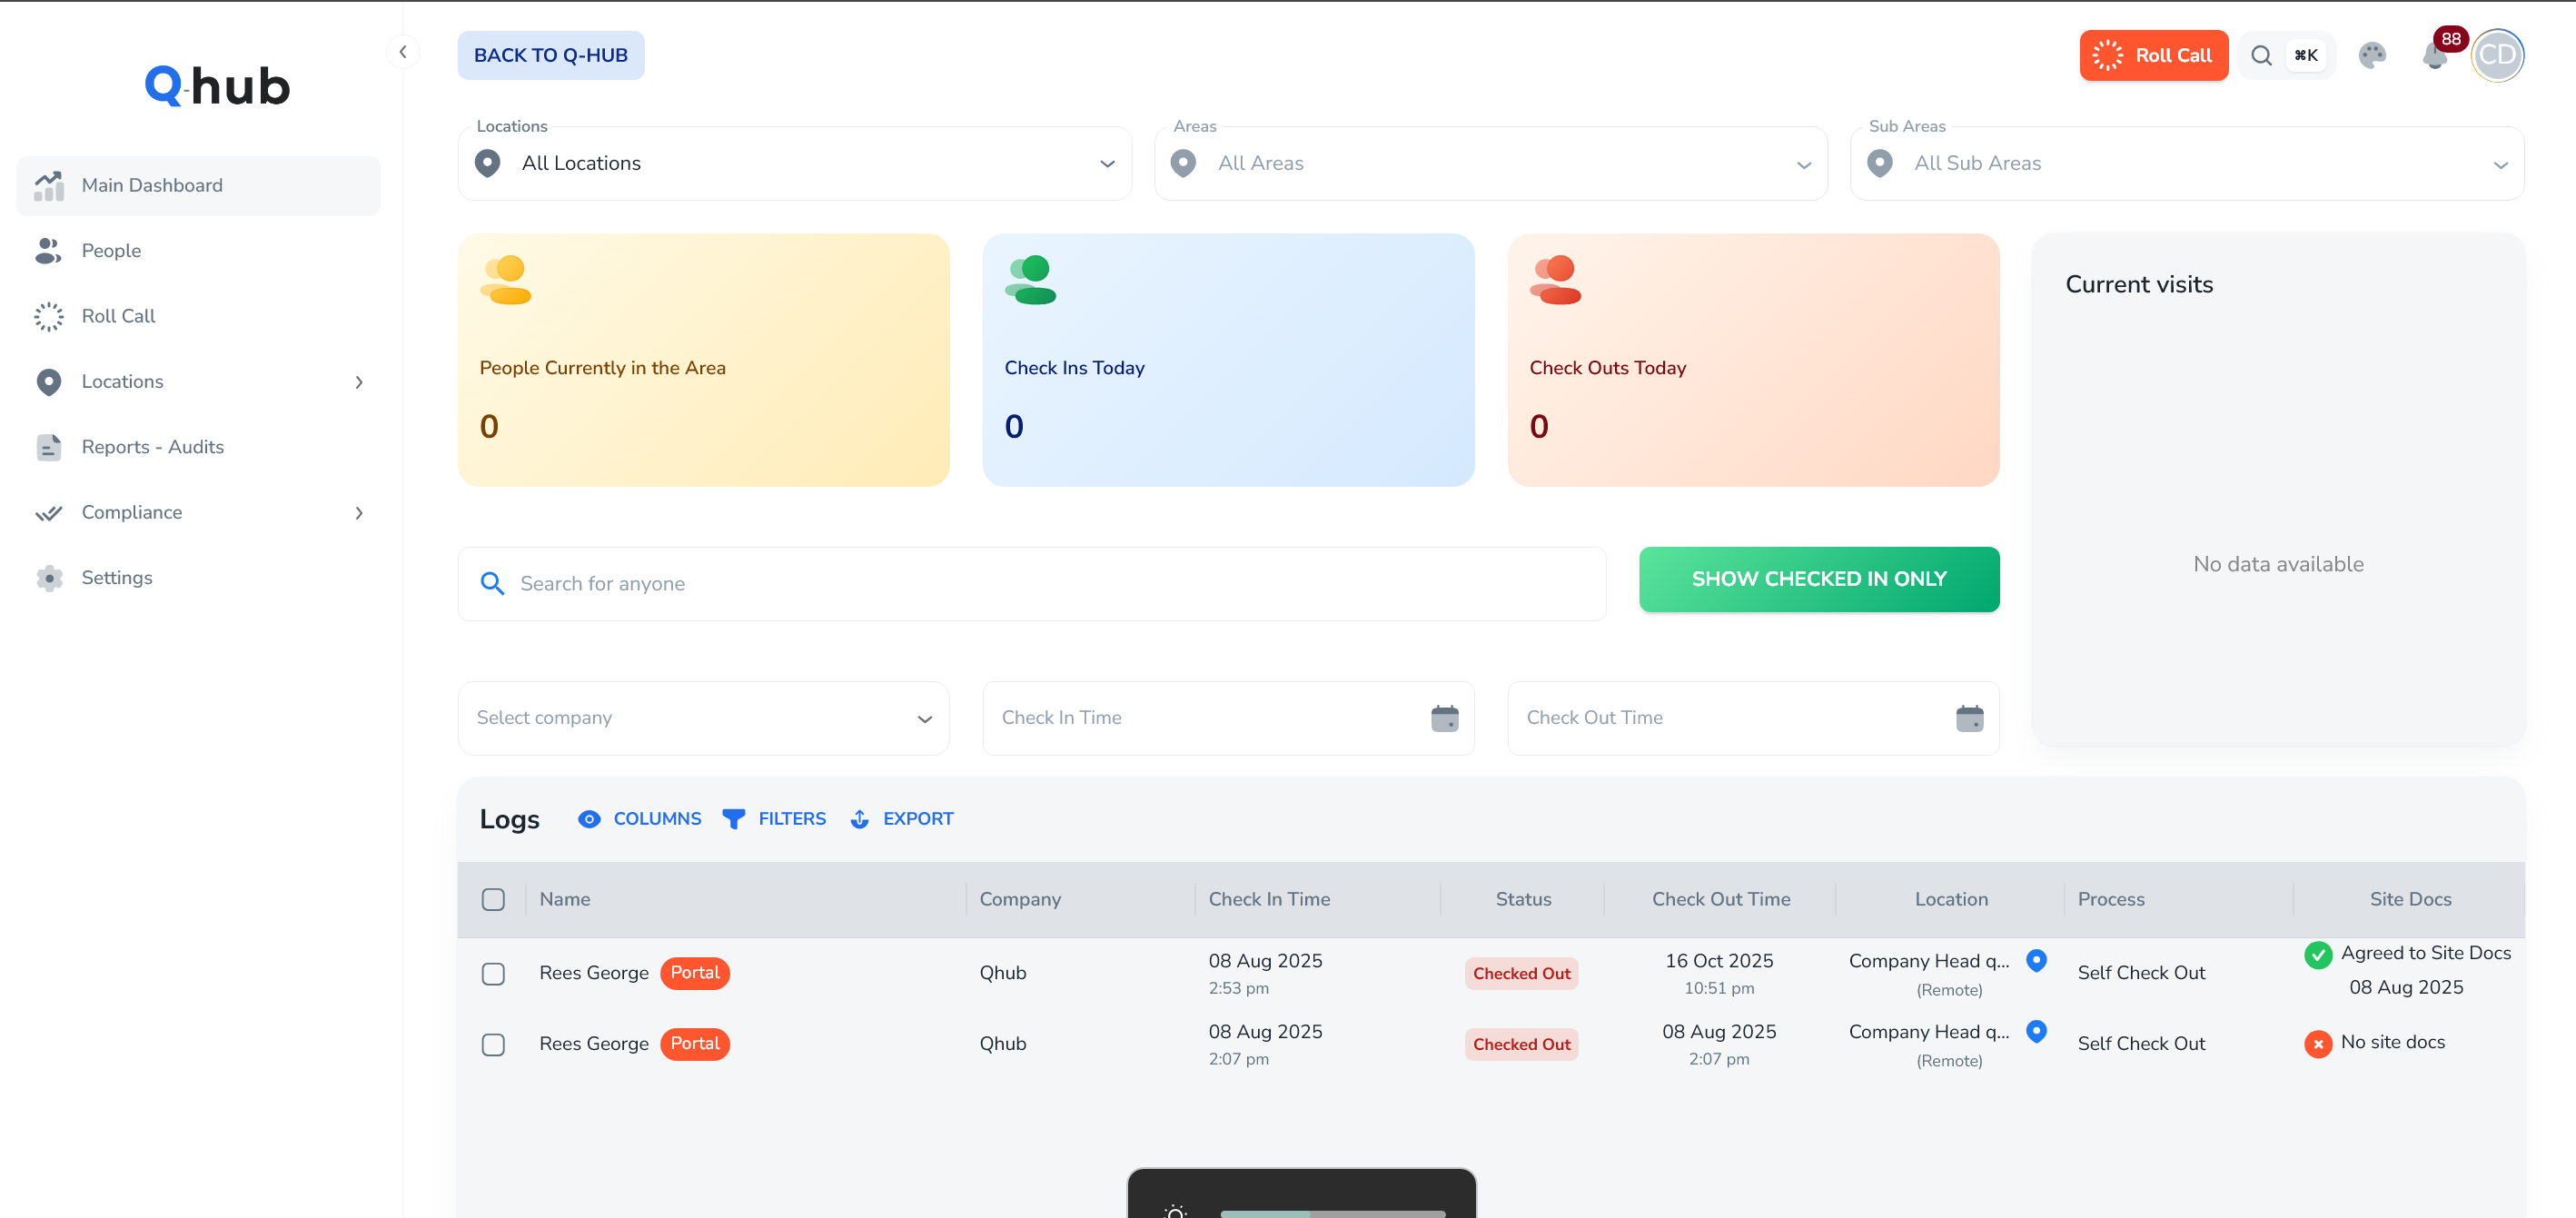
Main dashboard (location-driven logs)
The main SISO dashboard is location-driven:
The top of the page shows locations, areas and sub-areas.
Selecting/typing into these filters:
Filters the KPIs (summary stats) at the top.
Filters the table of sign-in/out logs below.
Each log record includes, for example:
Location details
How the person checked in/out, e.g:
Self-service (user did it themselves)
Automatic
Manually checked out
Whether they agreed to site docs at that sign-in.
The dashboard is effectively your live and historical log of site attendance.
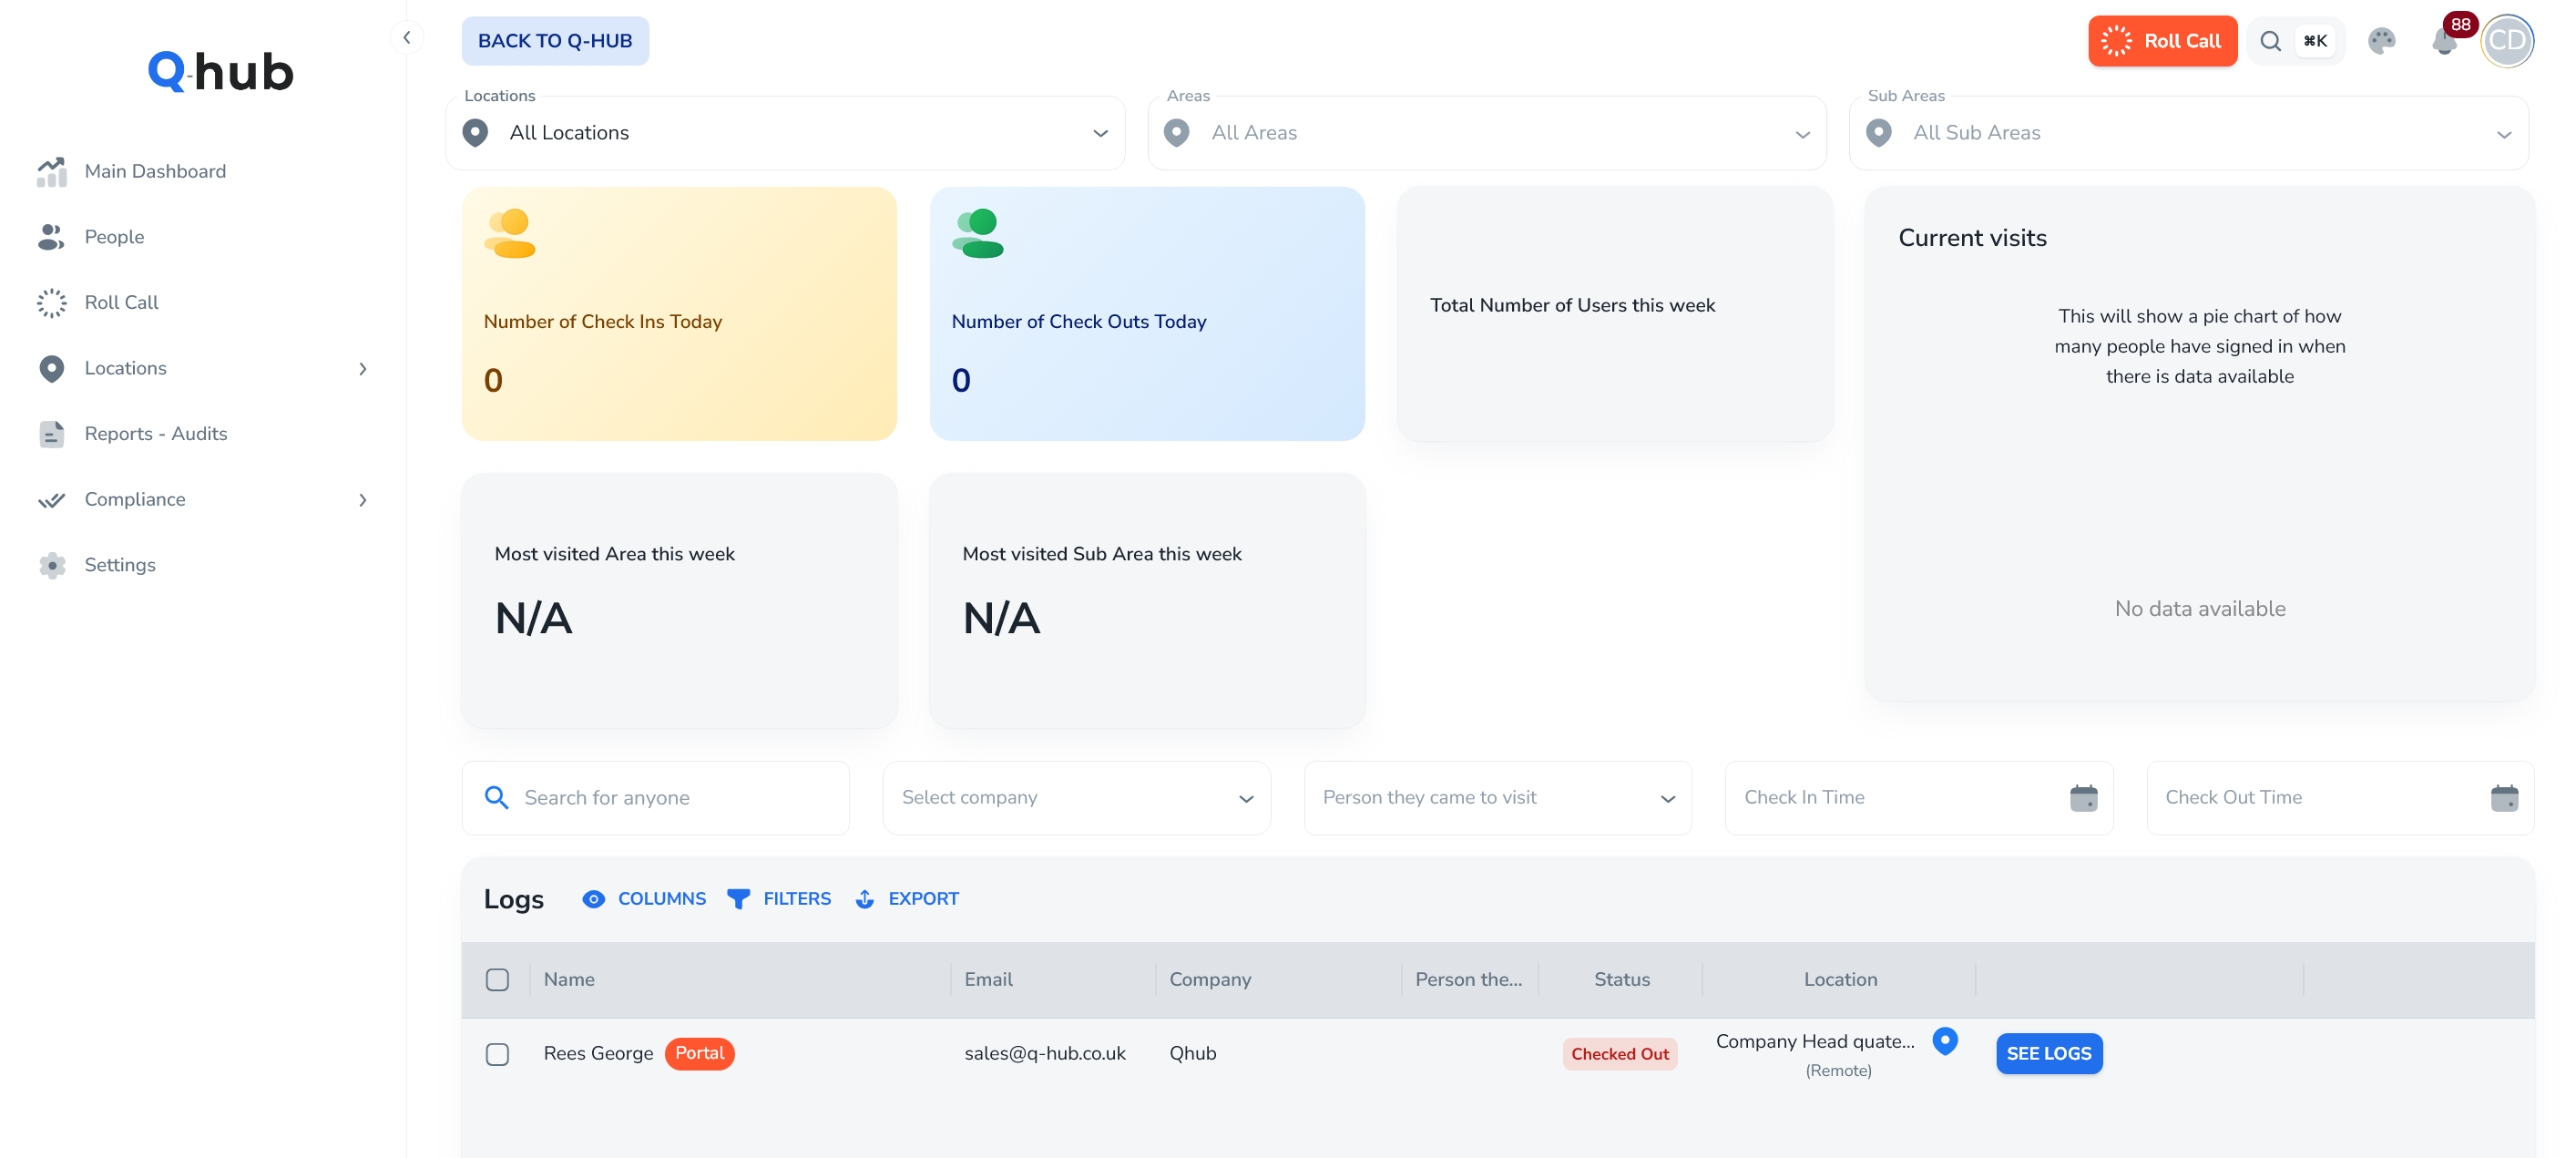
People page and personal logs
The People page works similarly, but from the person’s perspective instead of the site’s:
You can filter by locations/areas at the top.
KPIs update based on the filters.
The table shows every person who has ever used SISO (employees, contractors, visitors).
For each person:
Clicking “See logs” opens their person profile:
Filterable by check-in and check-out date.
Shows a full history of their sign-ins/outs.
For each entry you can:
View details from the sign-in form.
See which compliance tasks they completed.
See whether they signed site documentation (e.g. H&S doc).
Exports:
You can export logs to PDF or CSV for either:
A specific person (via the People page), or
A wider set of records (via the reports/dashboard pages).
Note: SISO does not automatically calculate time worked (hours between sign-in and sign-out). Users currently export data and calculate that in Excel or similar.
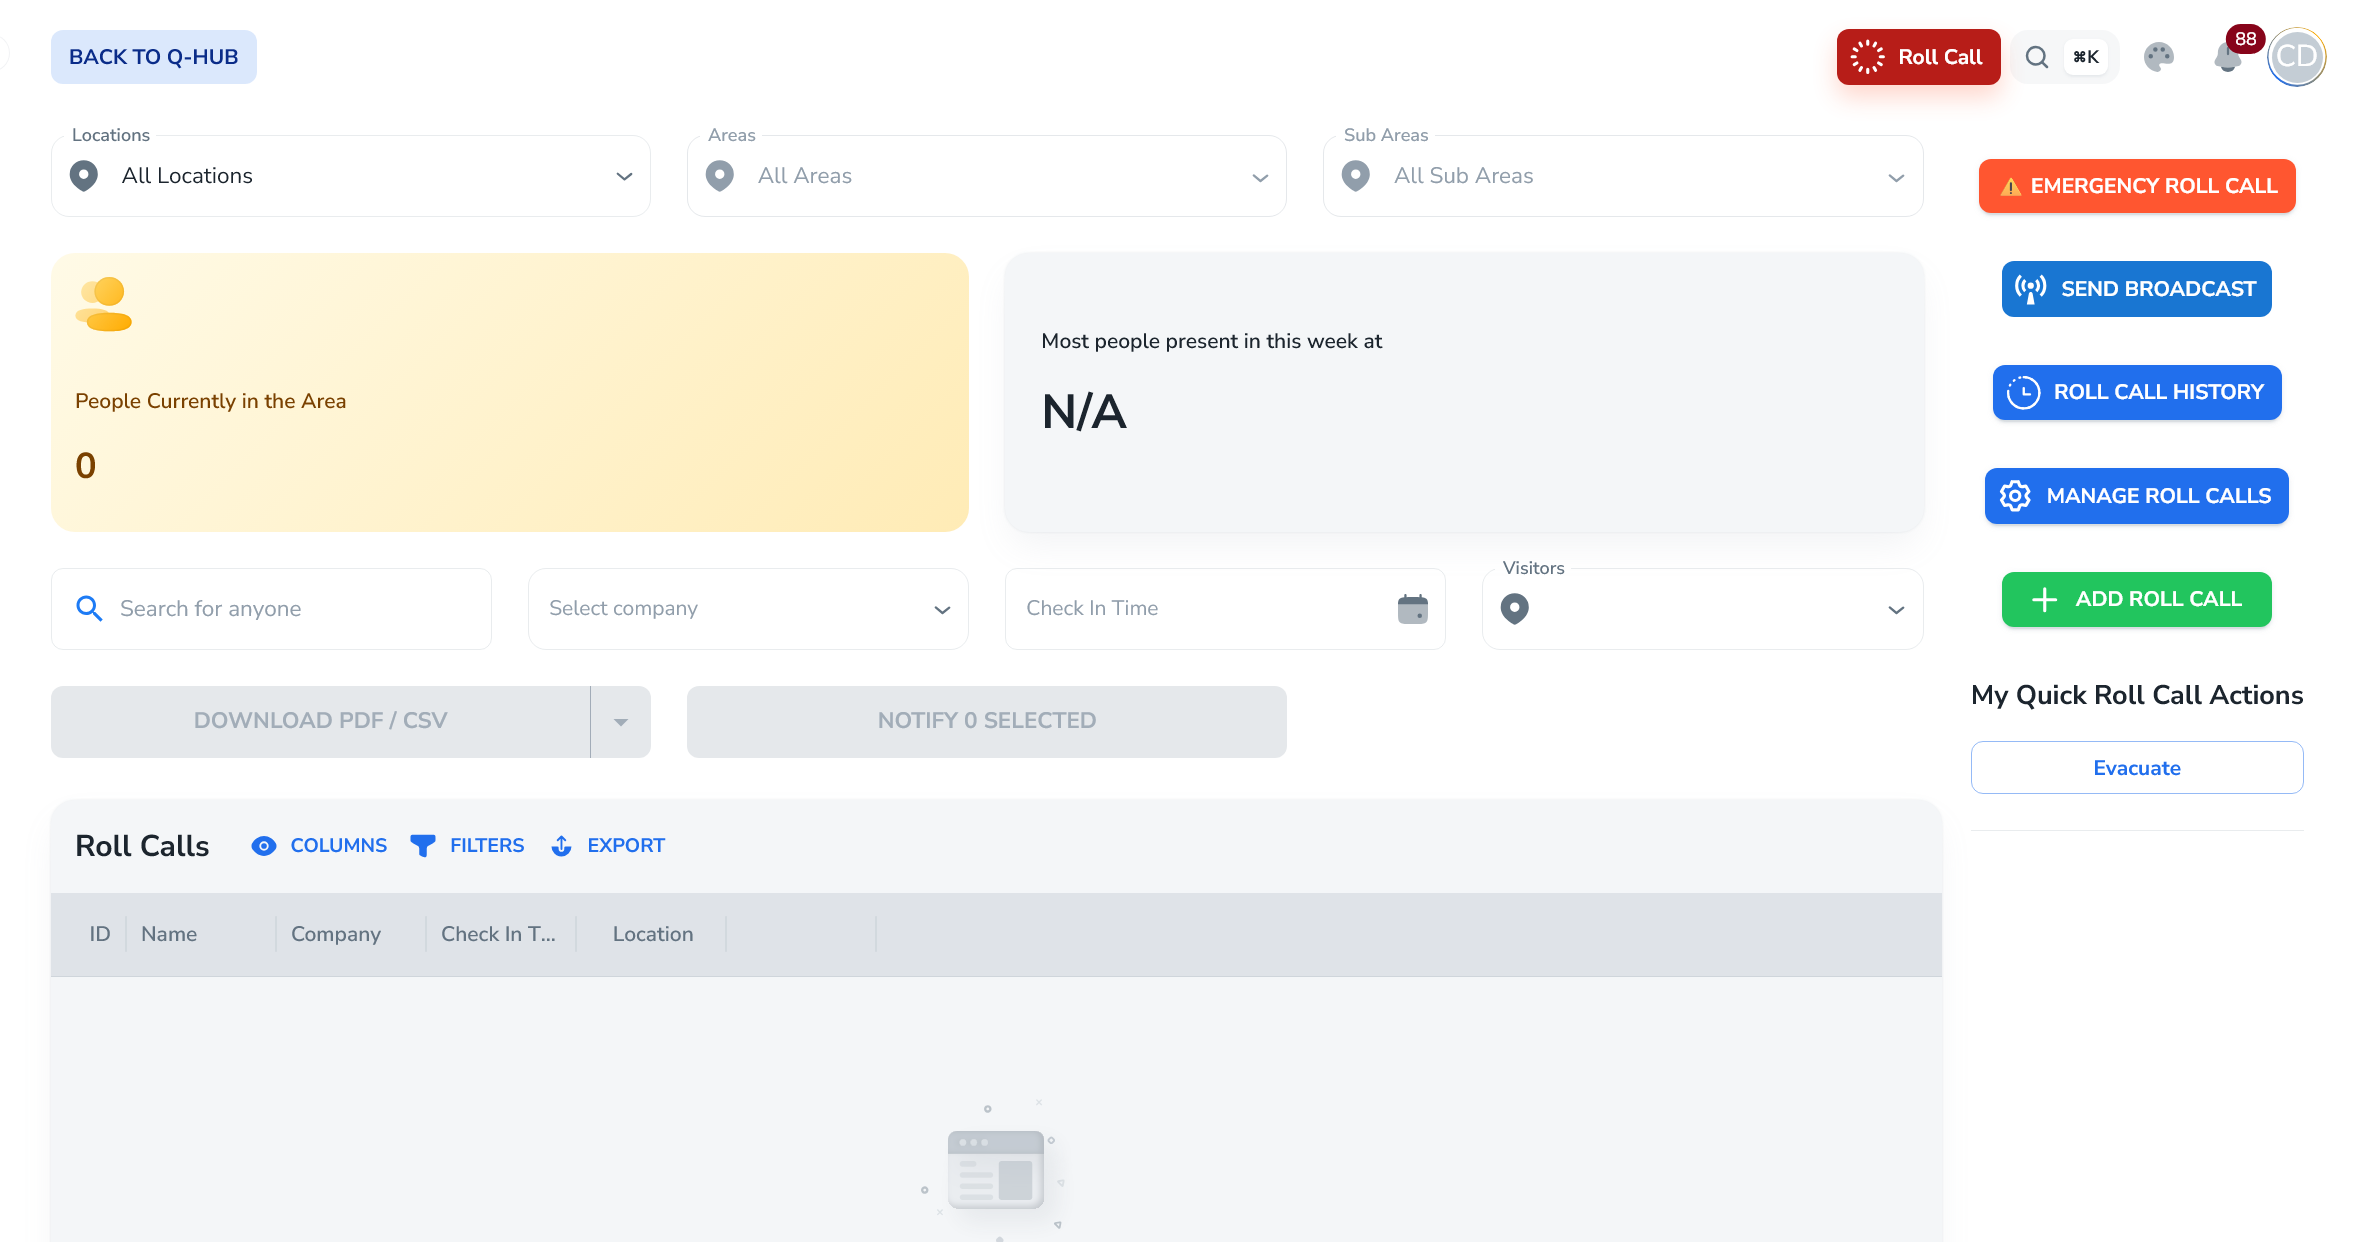
Roll Call (emergency & broadcast)
The Roll Call feature is built for compliance and safety communications:
It targets everyone currently signed in to a location.
You can trigger:
Emergency roll call – e.g. evacuation checks.
Broadcasts – non-emergency messages to active attendees.
When you send a roll call:
You choose the location.
Compose a message (e.g. “Evacuate to Assembly Point A”).
The system sends the message via:
The Q-Hub mobile app (if they have it).
Email, if an email is recorded.
Optionally SMS, if later configured.
Additional roll-call features:
Roll call history – every time you’ve run a roll call.
Includes stats on whether it was delivered or not, so you can confirm communication.
Manage roll calls – pre-create roll call templates such as:
“Evacuate”
“Emergency”
“Equipment issue”
“Person injured”
Shortcut at the top of the page to quickly trigger a roll call once configured.
Location management
The Locations area is one of the most important parts of SISO.
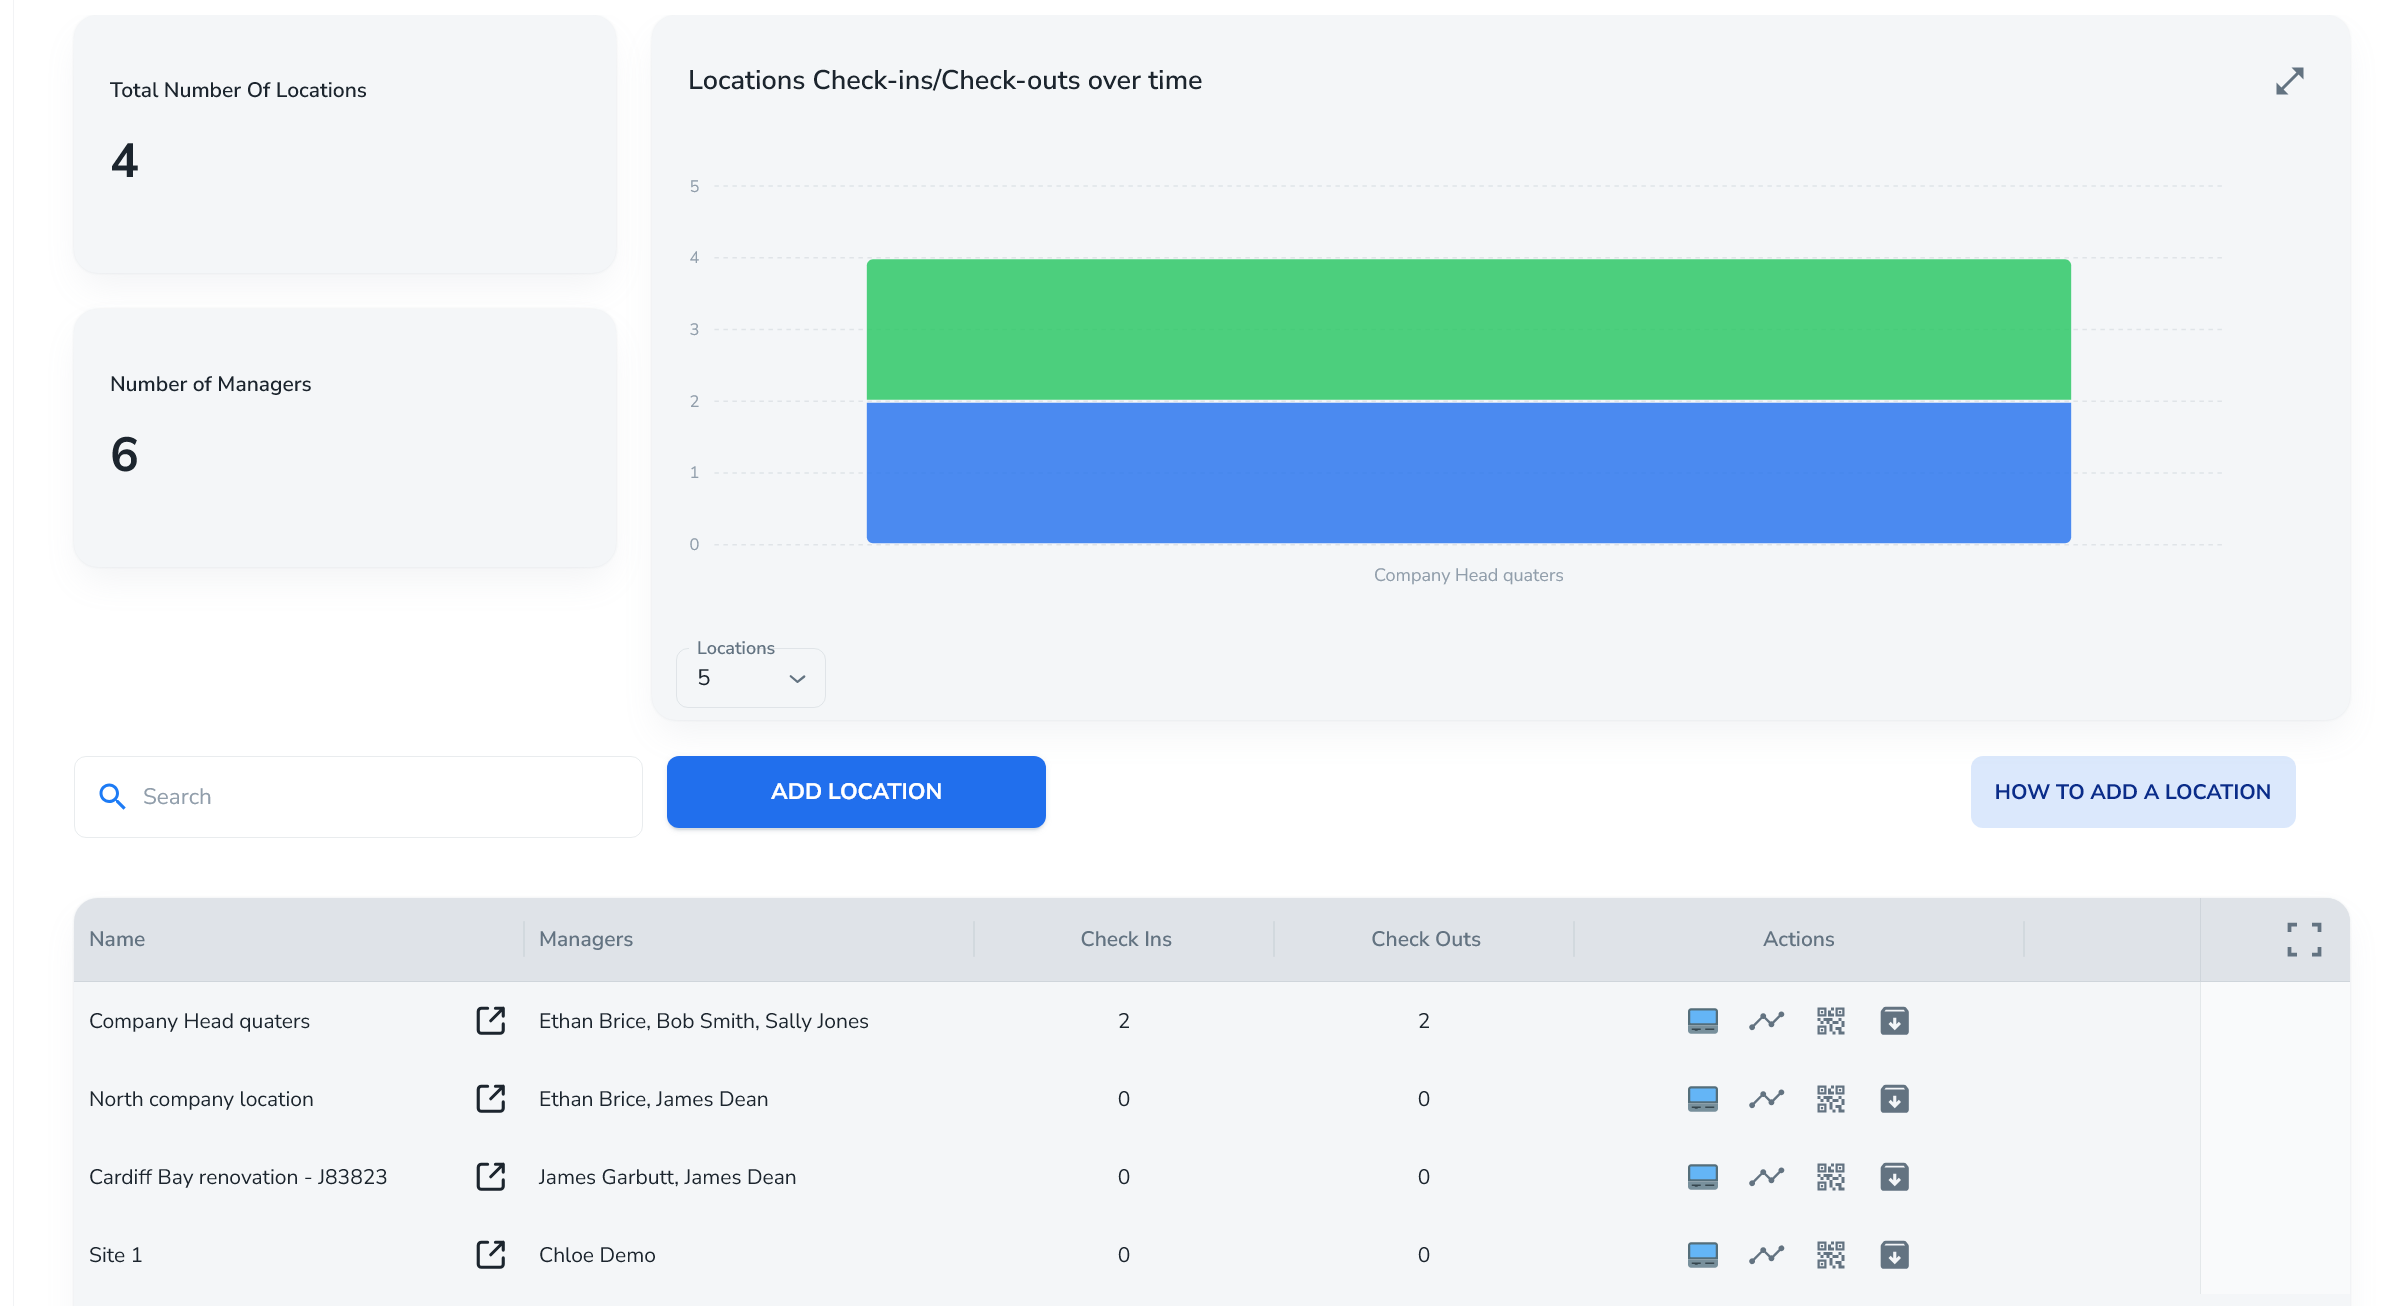
Managed locations view
The Manage Locations page includes:
KPI tiles showing overall activity for your locations.
A table listing all locations, including:
Numbers checked in / checked out.
Quick action buttons:
Generate kiosk user
View analytics
Get QR code
Archive location
You can also expand the table to full screen, sort, and filter.
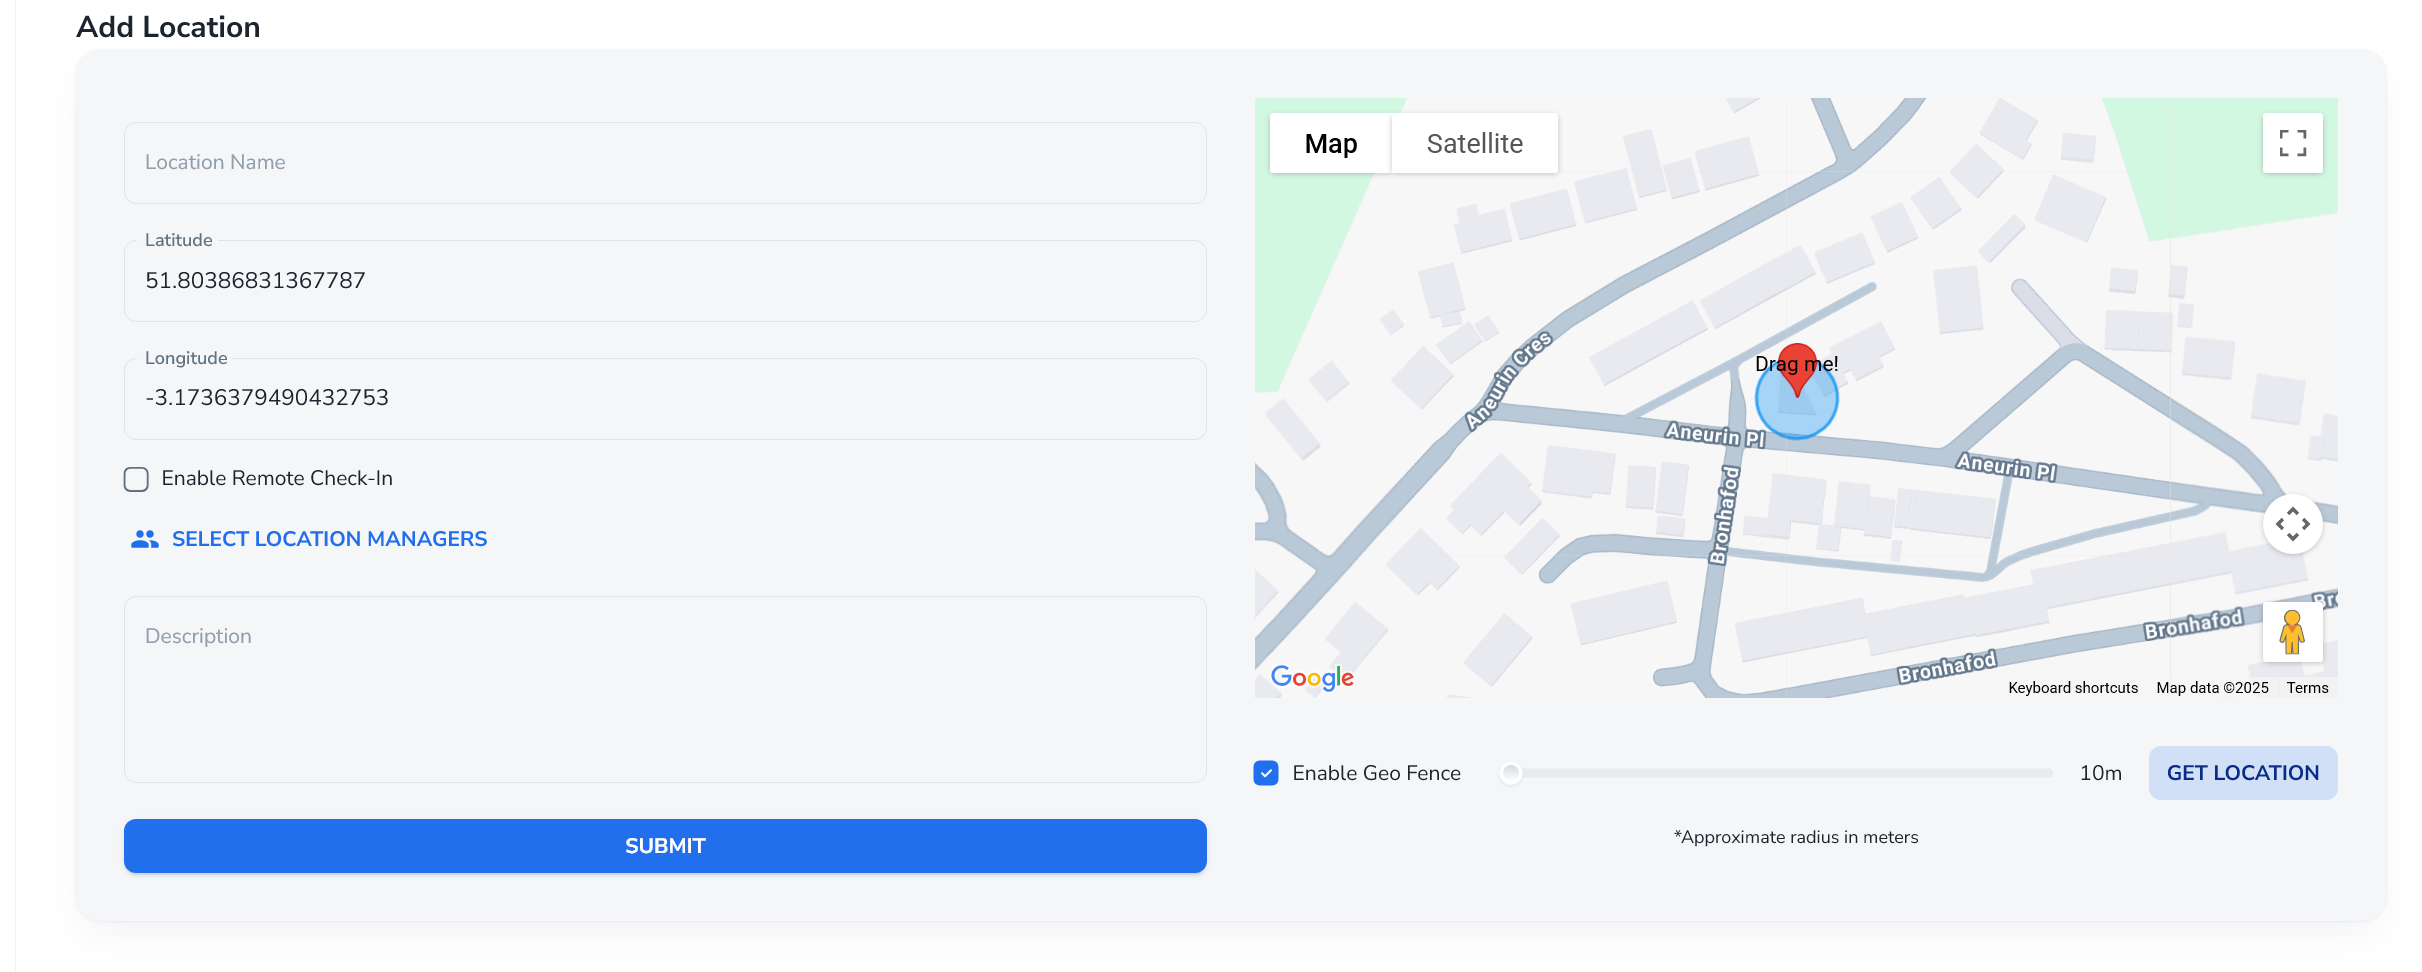
Adding a new location
To add a location you can use the “Add location” button (top or within the page):
Allow location access (optional)
Browser asks for permission to use your location.
If allowed, SISO automatically picks up your coordinates for the site.
Set location details
Name the location.
Choose whether to enable remote check-in:
If enabled, people can sign into this location without physically being there.
Useful for remote teams that need a central “Head Office” / “General” location.
Assign location manager
By default, admins have access to all locations.
You can additionally assign portal users as location managers for this site.
Enable geofence (optional)
If enabled, users must be inside a defined radius (“blue circle”) to check in.
The phone’s GPS verifies they are physically within the geofence before allowing check-in.
Once you click Submit, the location is created and opens its location detail page.
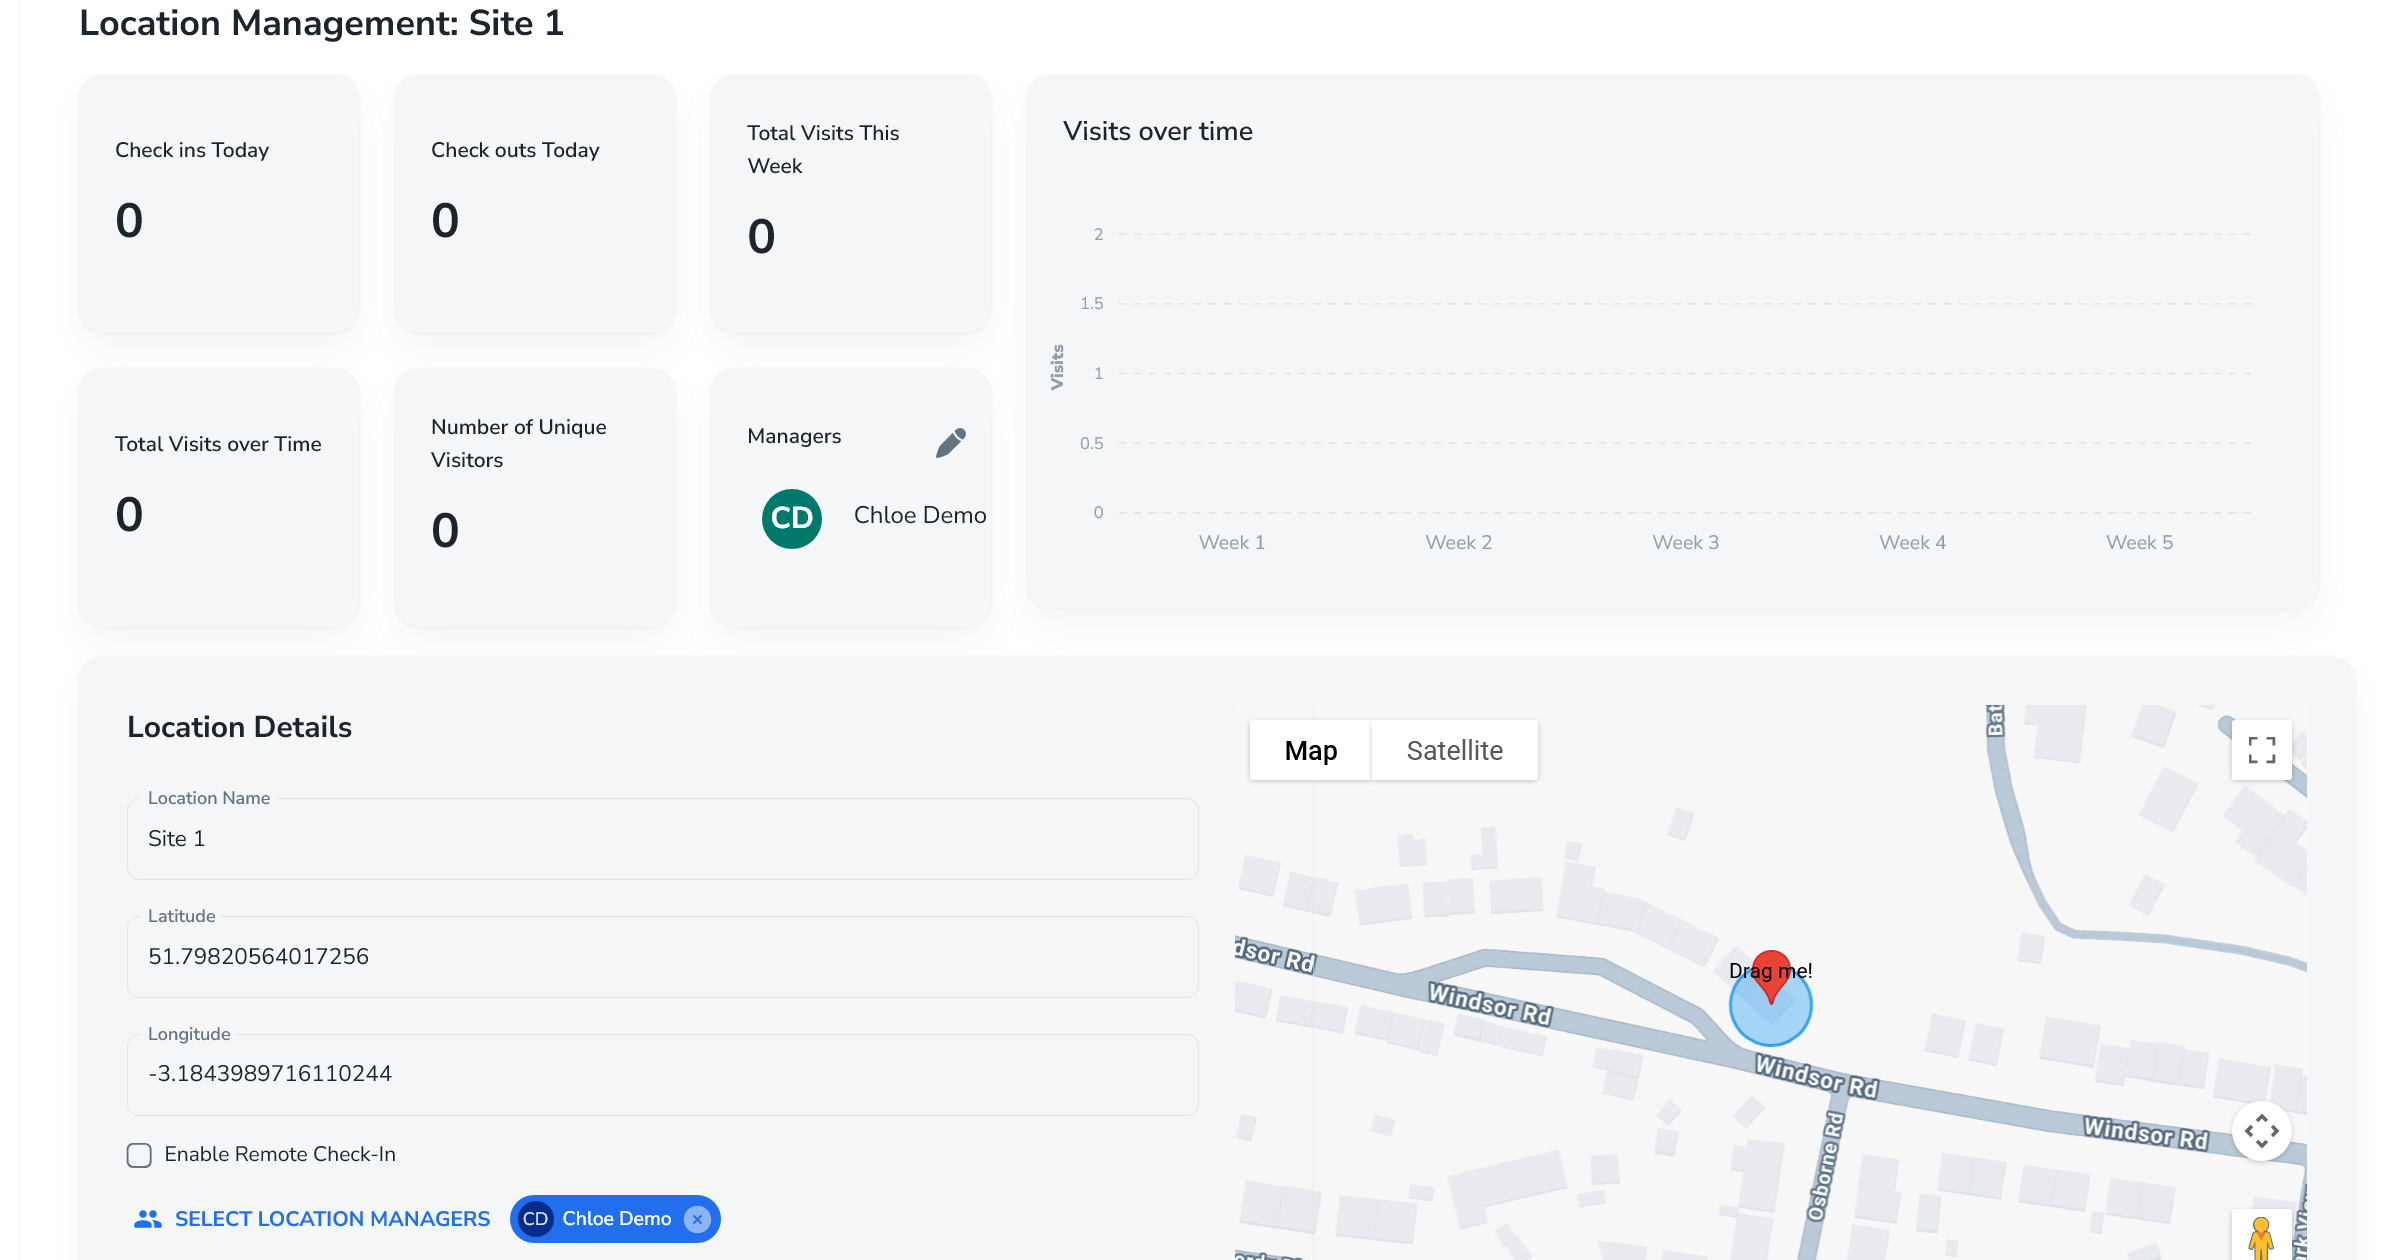
Lcation detail page
The location page includes:
KPIs at the top (attendance metrics).
Managers section – edit the manager(s) for this location.
Location details – editable configuration for the site (name, settings, etc).
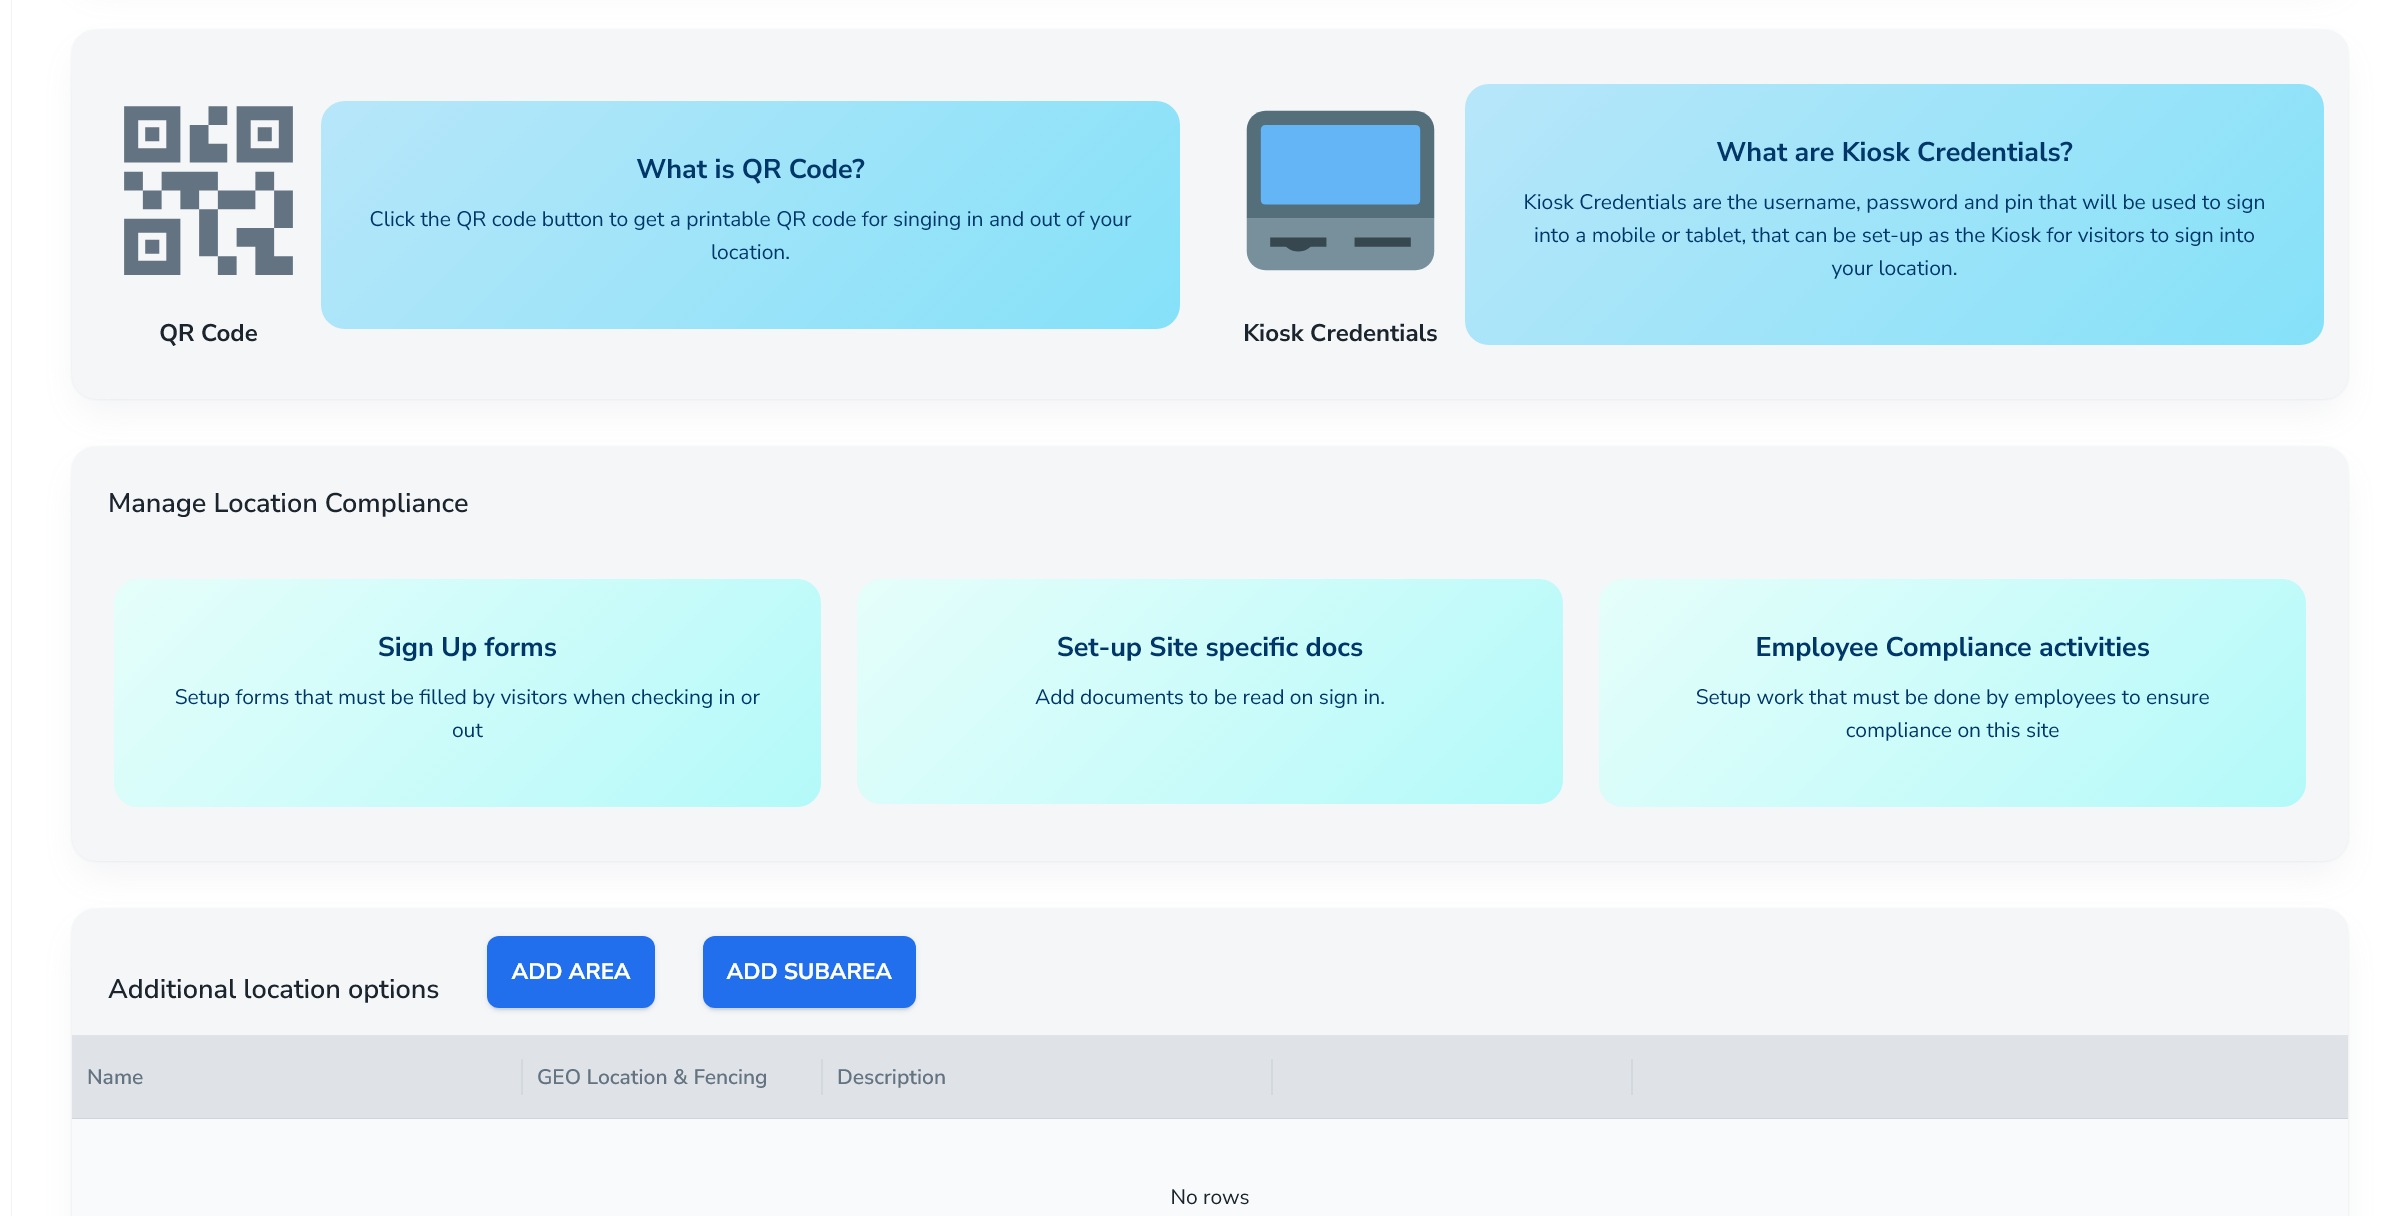
Key location-specific tools:
QR code sign-in
You can generate a QR code for the location.
People (including those without a Q-Hub account) can scan the QR code:
To sign in to that location.
To sign out later by following the process again.
This is usually recommended for visitors, as it’s quick and easy.
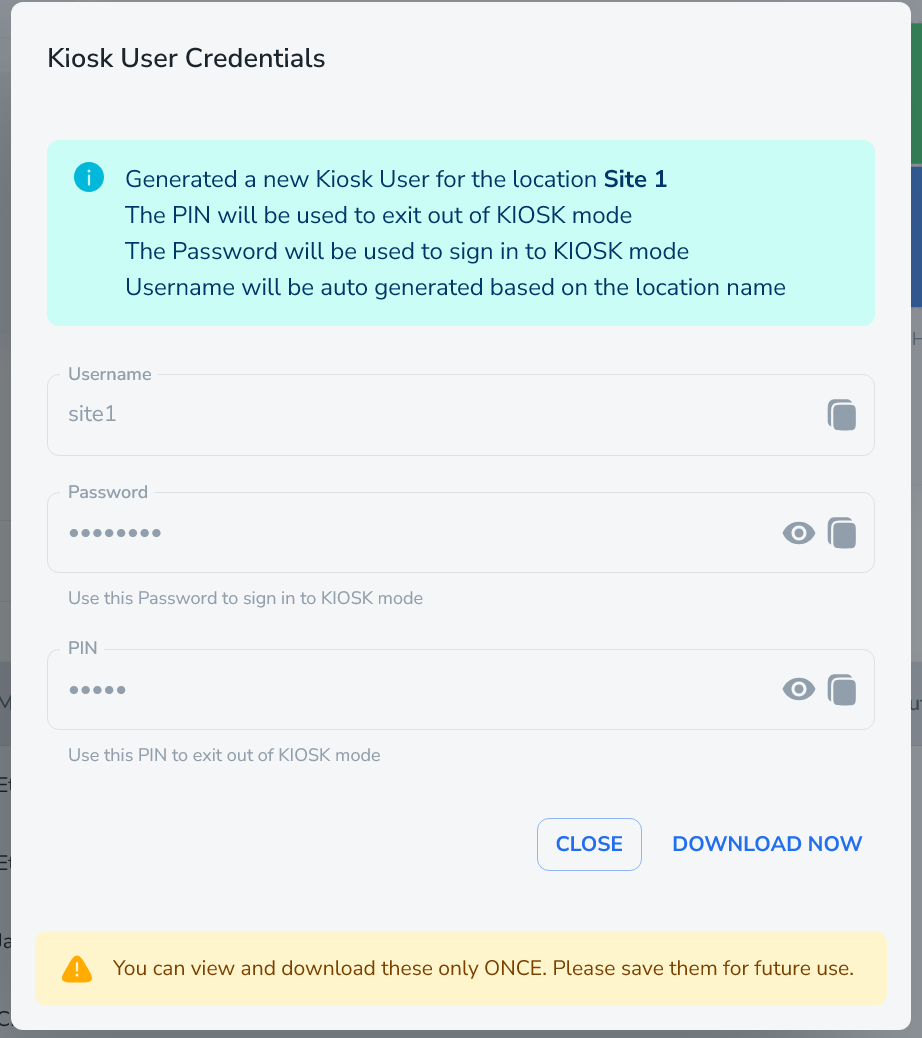
Kiosk mode
You can set up a kiosk user (tablet mode) for a location:
Click “Kiosk”.
Click “Generate now”.
System generates a kiosk username, password, and PIN.
Save these credentials safely.
When logging in with kiosk credentials:
The app displays a simplified kiosk interface only:
Just “Check in” and “Check out”.
Designed for a tablet fixed at reception or site entrance.
To change kiosk mode or location you must use the PIN, so casual users can’t exit kiosk mode and browse the wider system.
Sub-areas
You can add sub-areas beneath a location (e.g. building, floor).
Sub-areas can have similar configuration rules to the main location (e.g. forms, docs).
When signing in, users can be asked to select a sub-area to improve traceability.
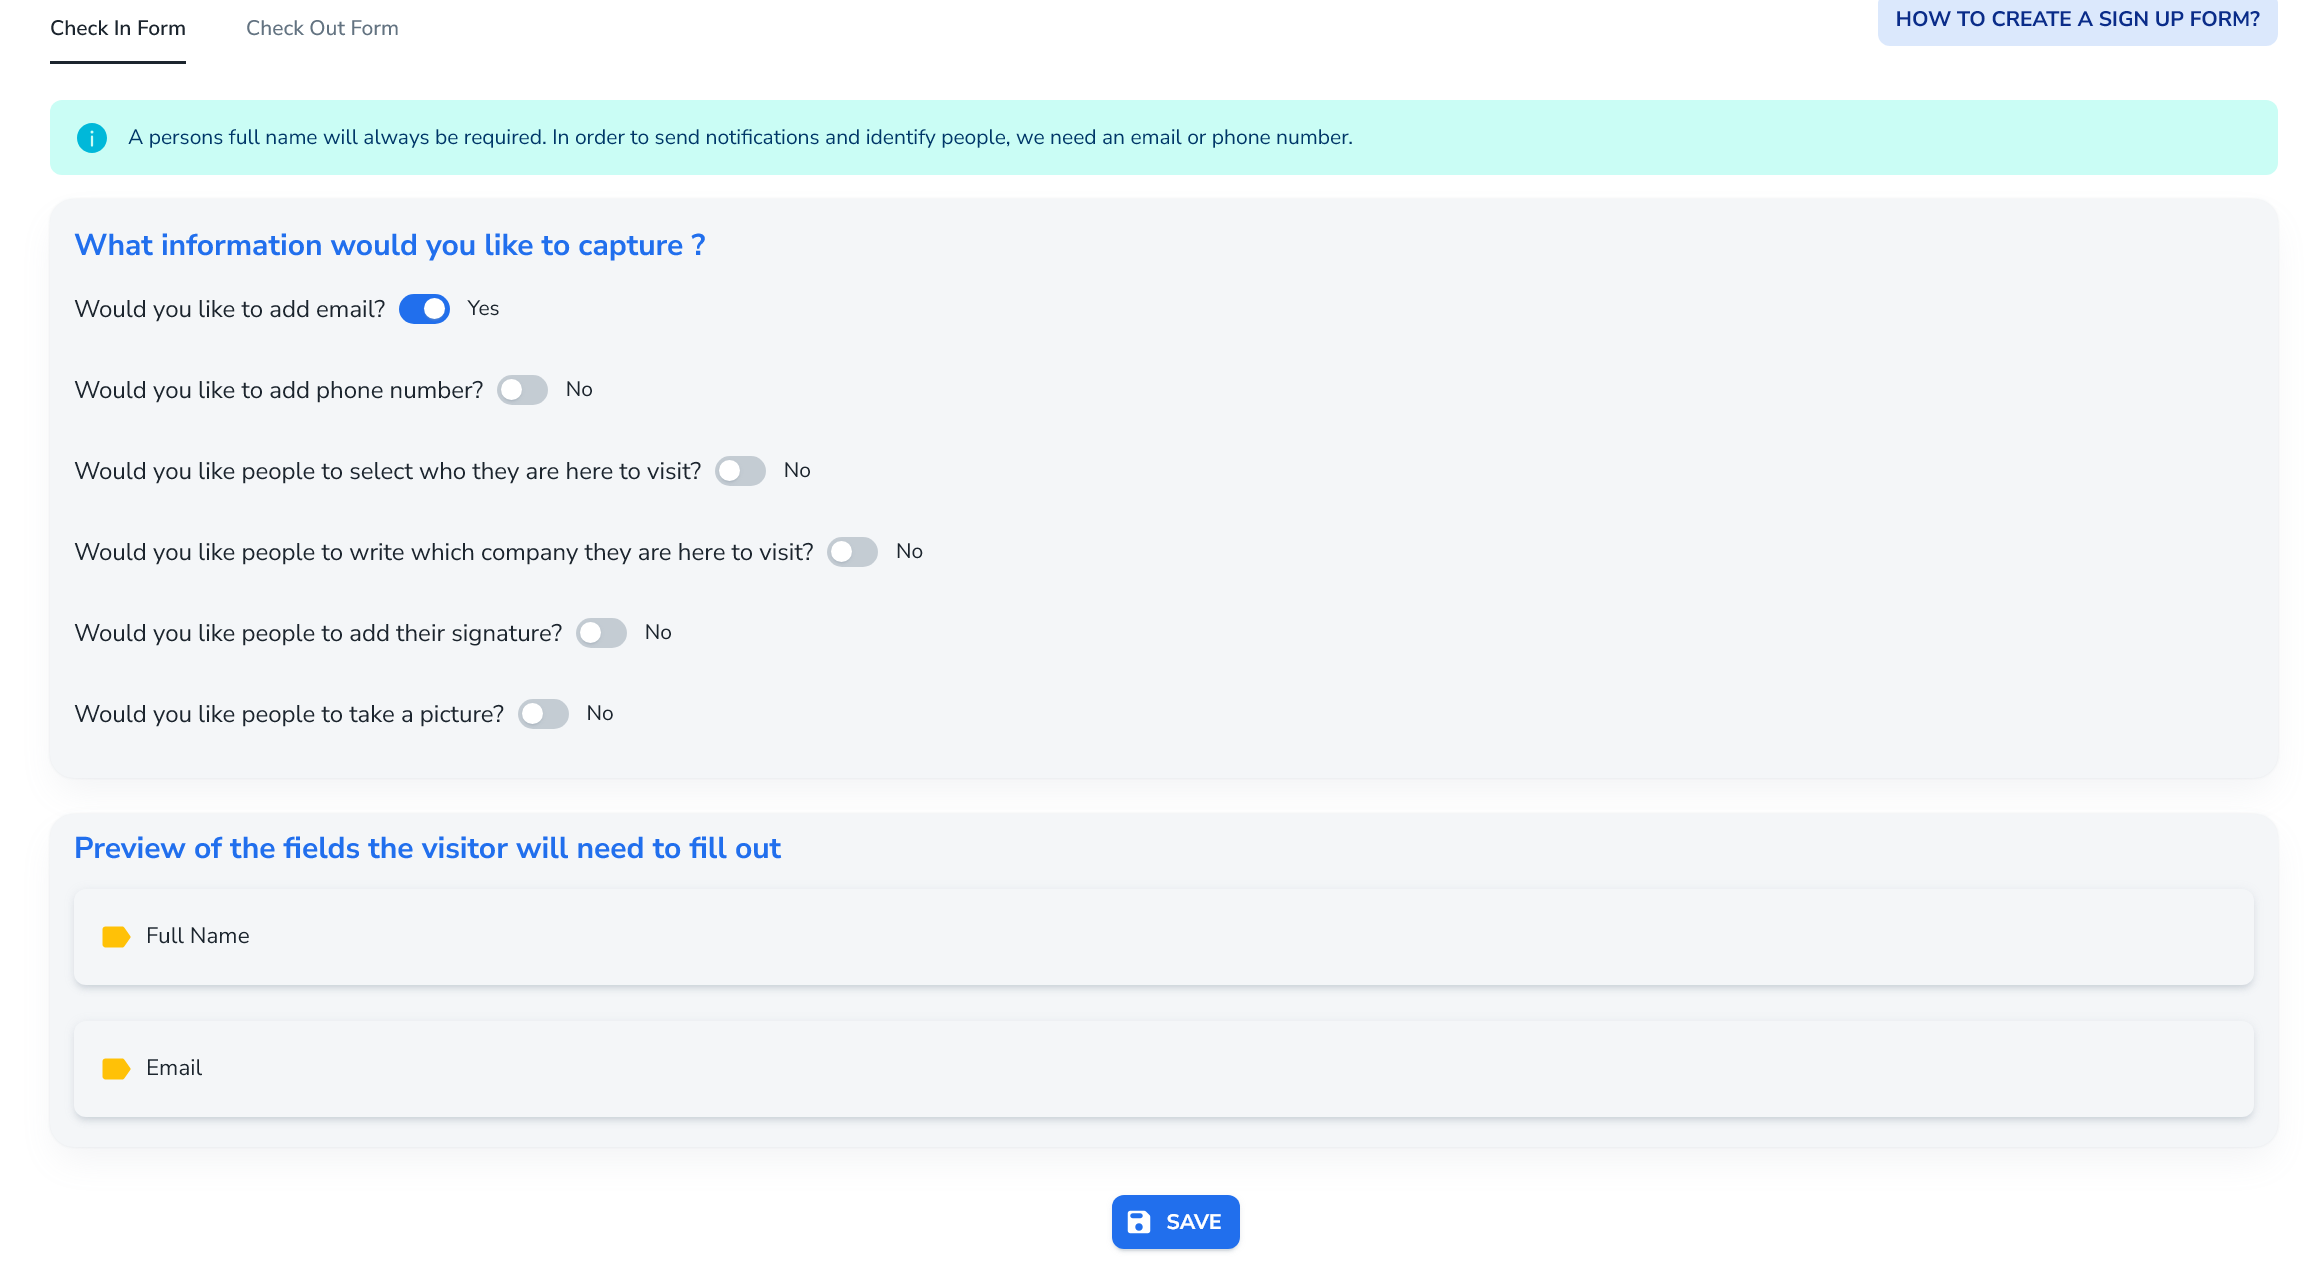
Sign-in and sign-out forms
On each location, under Manage Location Compliance, the “Sign-up forms” tab controls what information is collected when users check in and check out.
Check-in form options
For the check-in form, you can choose:
Identity fields (at least one of):
Email (commonly used)
Phone number
Optional extra questions:
Who they are visiting
What company they are from
Signature
Picture
These settings are per location – you configure them individually for each site.
Check-out form options
For check-out:
Similar concept, with fewer options than the check-in form.
Again configured per location, not globally.
By default, the system keeps things simple with full name and email only if you don’t customise the forms.
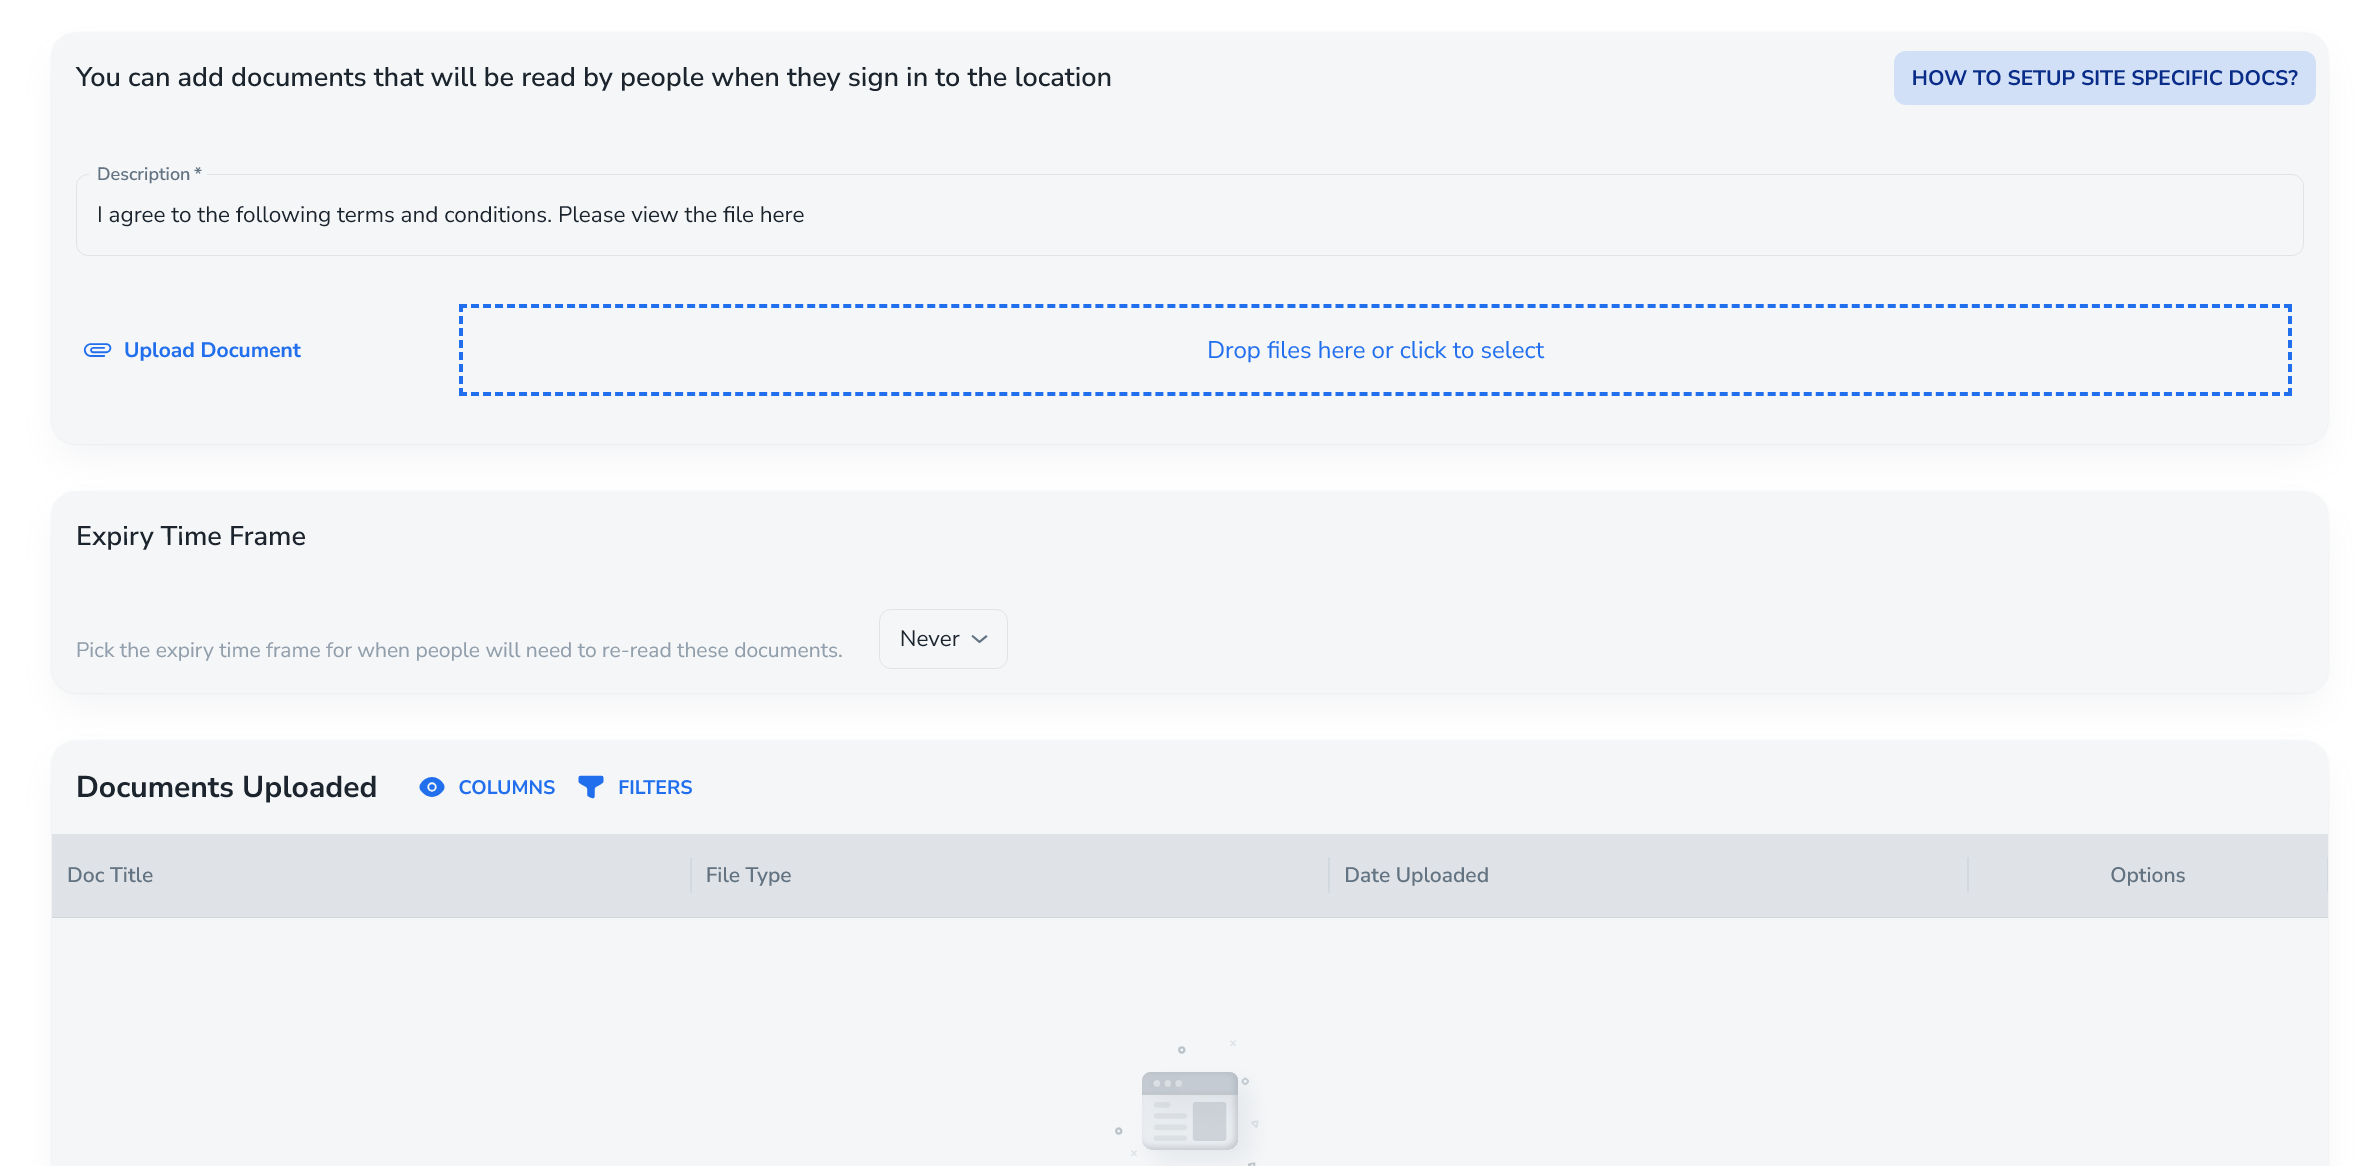
Site-specific documents
Site-specific documents are local to a location and deliberately separate from Q-Hub’s global Read & Understood compliance features. They are used when:
You need evidence that people on this site have read specific documents, but
You do not need those documents to show up in your main Q-Hub compliance records.
Typical example:
Your team is working on a project at a client’s site.
The client has their own site rules / inductions which must be read by anyone entering.
You don’t want these to clutter your internal compliance records, but you do need proof they were shown and accepted at the gate.
Configuration steps:
On the location, open Site documents / Site specific docs.
Click “Set up site docs”.
Optional: customise the description shown to the user when they log in.
Upload one or more documents.
Set an expiry time frame, e.g.:
1 year / 90 days – if someone returns after this period, they must re-read the docs.
Never – once read, they never need to re-read for this location.
Managing existing site docs:
Table shows:
Document title
File type
Actions:
View – open the document.
Delete – remove it from the site.
Replace – upload a new version.
If you replace any document, SISO forces everyone to re-read all site documents for that location next time they sign in, regardless of previous expiries. This is because site docs usually interrelate and a change in one can affect all.
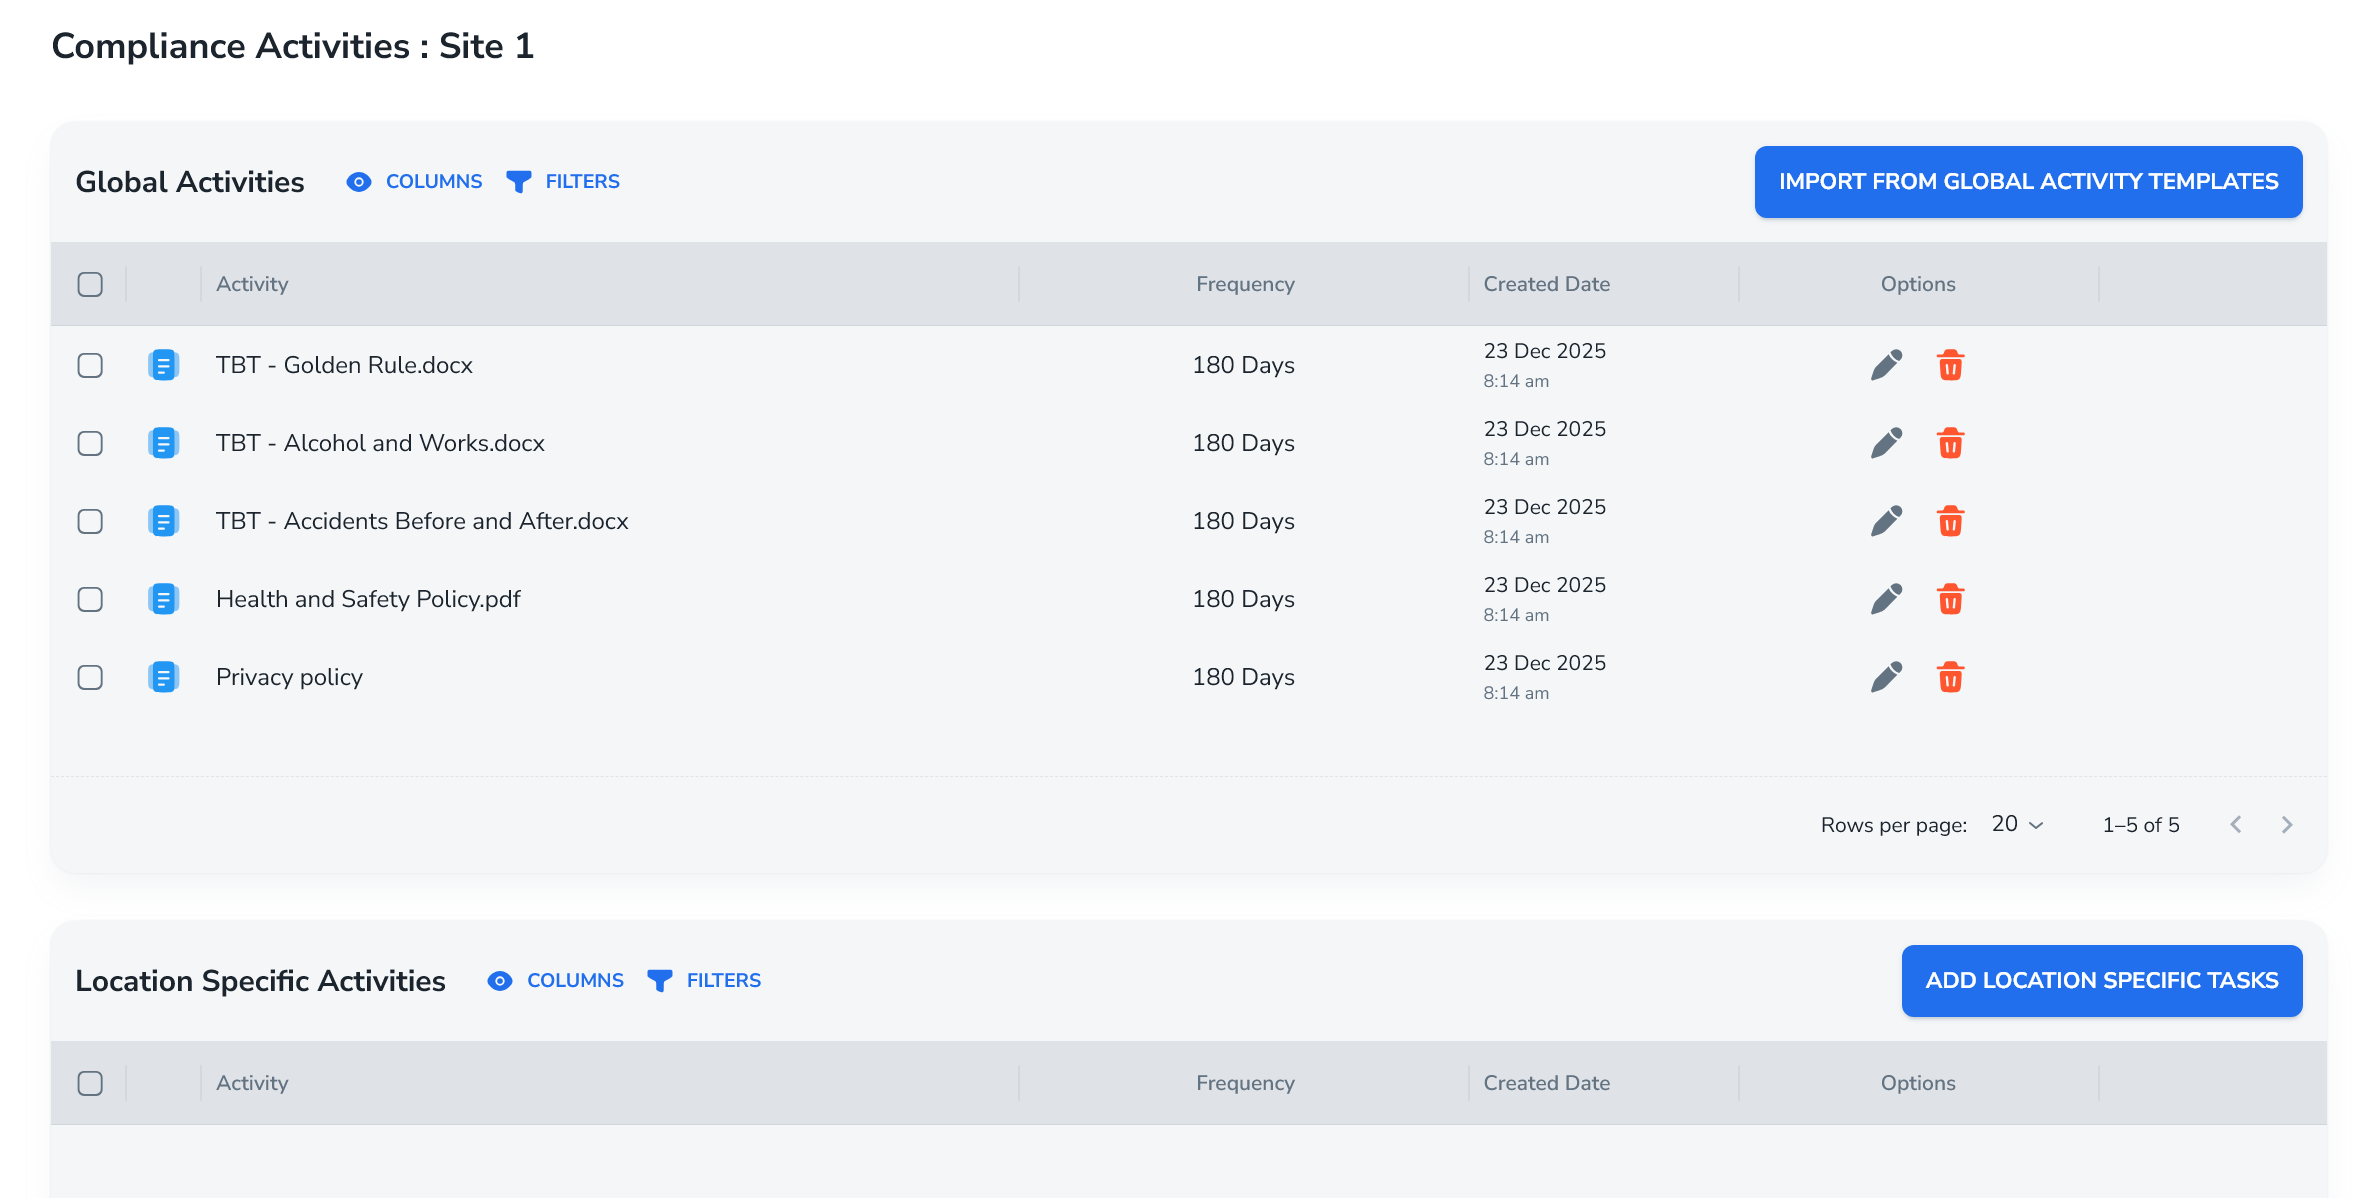
Employee compliance activities (connected to Q-Hub)
This section is for Q-Hub users (employees) and is integrated with the main Q-Hub compliance system.
Under Employee Compliance Activities you’ll see:
Global activities
Location-specific activities
This is where you define compliance packs that are triggered when someone signs in to a location.
Global vs local activities
When creating a new compliance activity:
Choose Global – applies to all locations.
Or Local – applies only to selected location(s).
You then name the pack, e.g.:
“Health and Safety Pack – Site X”
Each pack can contain multiple activities, such as:
Read & Understood document (connected to Q-Hub Read & Understood)
Form completion (e.g. site questionnaire, checklist)
Example pack configuration
Add Activity 1 – Read & Understood
Pick a document (e.g. “Health & Safety Policy”).
Configure:
Optional frequency, e.g. every 180 days.
Required vs skippable.
Option to auto-assign to newly created locations.
Priority (ordering in the activity list).
Important integration detail:
The system checks if the user has already completed this Read & Understood in Q-Hub:
If yes, and the document hasn’t changed, they won’t be asked again.
If they complete it via SISO, it updates the main Read & Understood logs in Q-Hub as well.
Add Activity 2 – Form completion
Pick a Q-Hub form (e.g. “Site Access Checklist”).
Configure whether it:
Must be done only the first time they attend.
Or follows some other rule (e.g. every visit).
After adding activities, you see a pack list indicating:
Which activities are skippable or not.
Which locations the pack applies to.
You can then assign the pack:
To one specific location, or
Click Assign all to apply it across all locations.
Compliance logs and packs overview
From the Compliance tab:
Compliance dashboard:
KPIs about completed compliance activities.
Filters by location.
Compliance logs:
A log of every compliance activity completed:
Who did it
When
At which location
Links to:
The session (sign-in / sign-out record).
The completed form (if applicable).
Activity pack list:
Shows all compliance packs
Indicates which locations each pack is linked to.
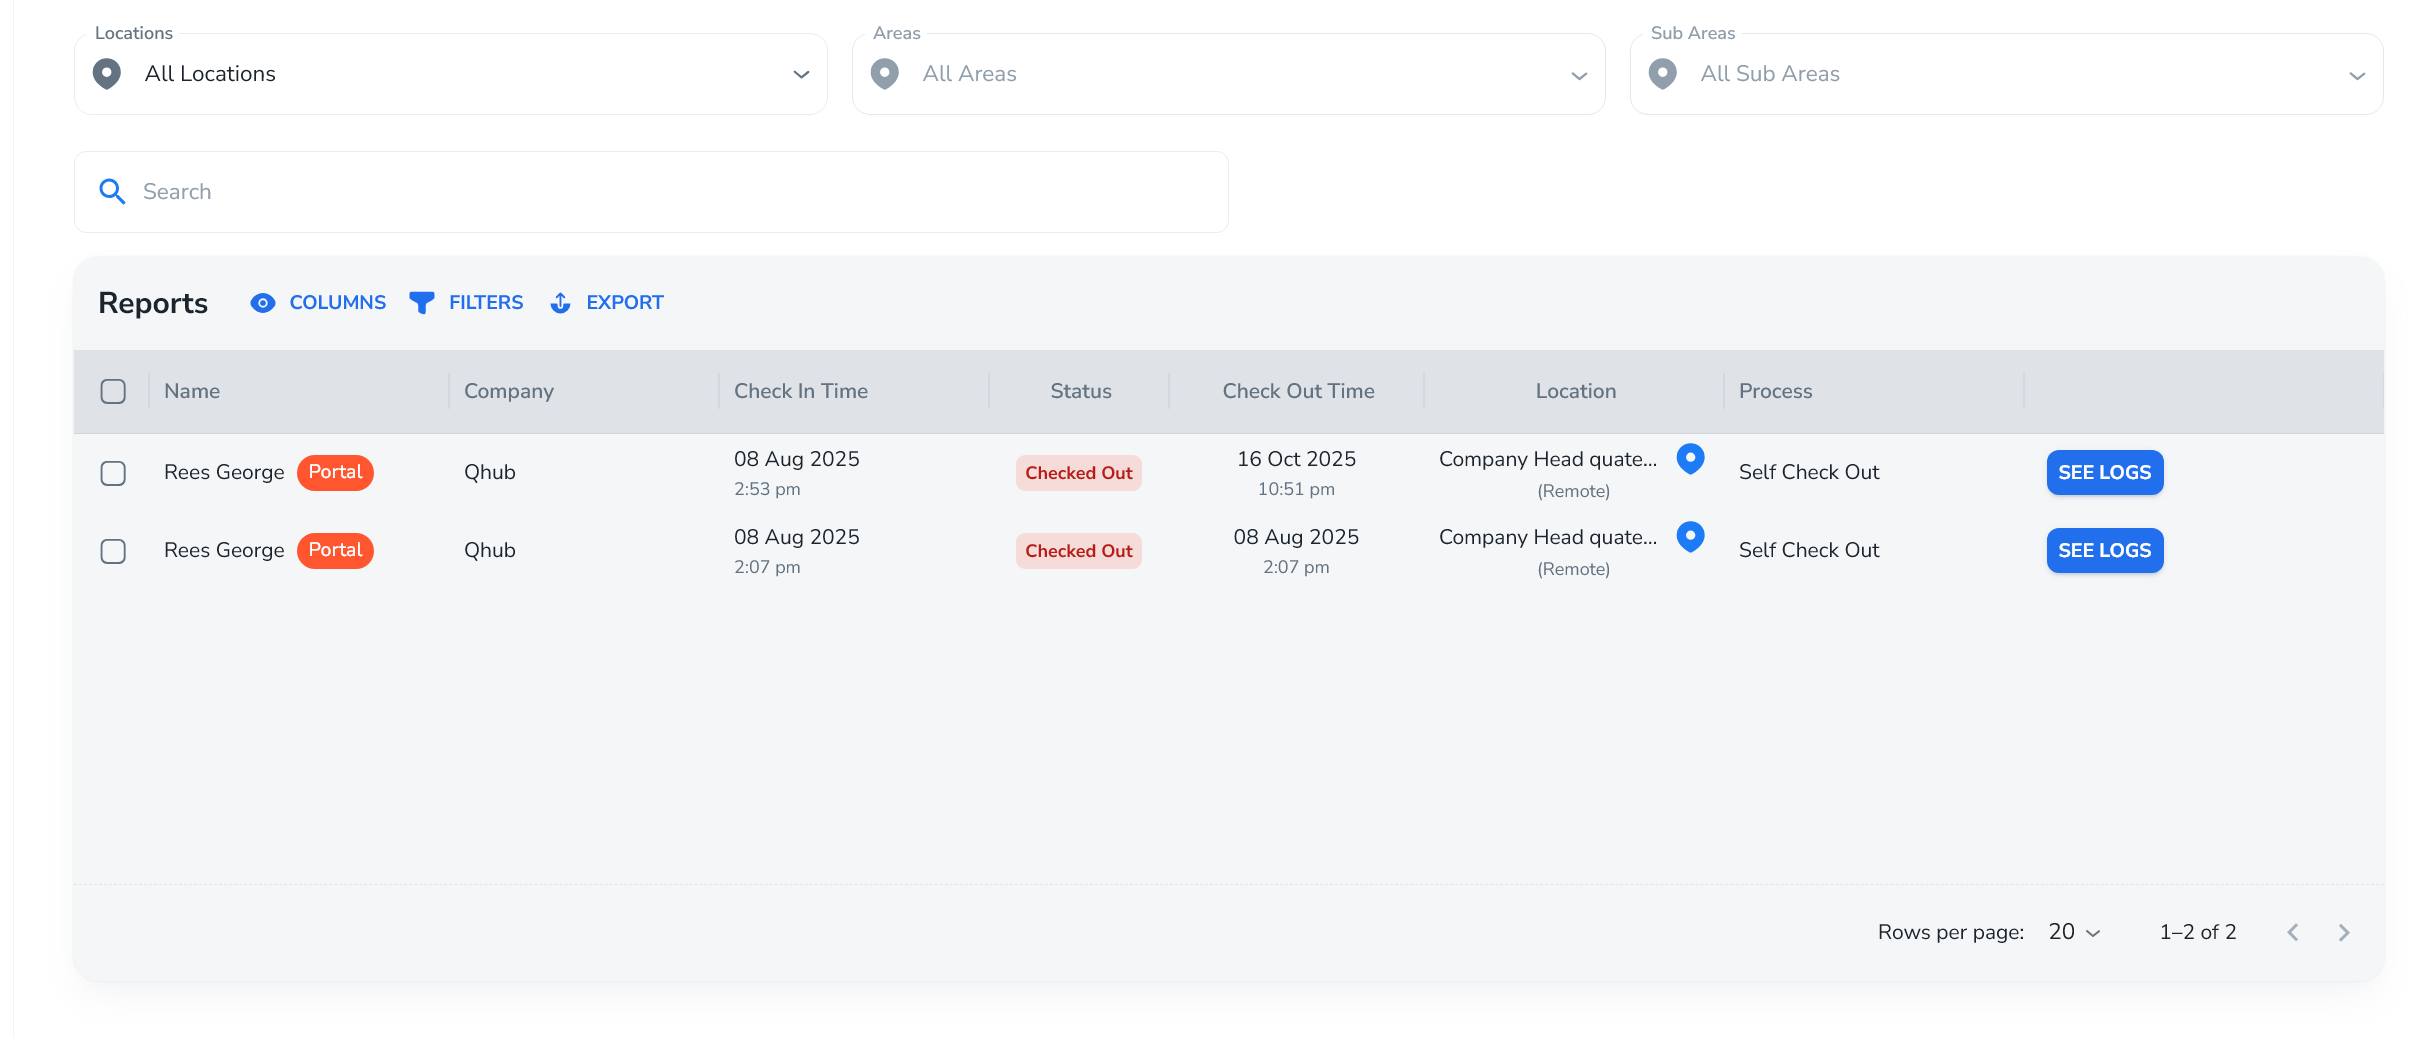
Reports
The Reports page is a dedicated view focused on who checked in/out, where, and when:
Filter by location to view all logs for that site.
Filter by time frame (e.g. “previous month”).
Export to CSV or PDF for records of:
All sign-ins/outs matching your filters.
For per-person logs and exports, use the People page instead.
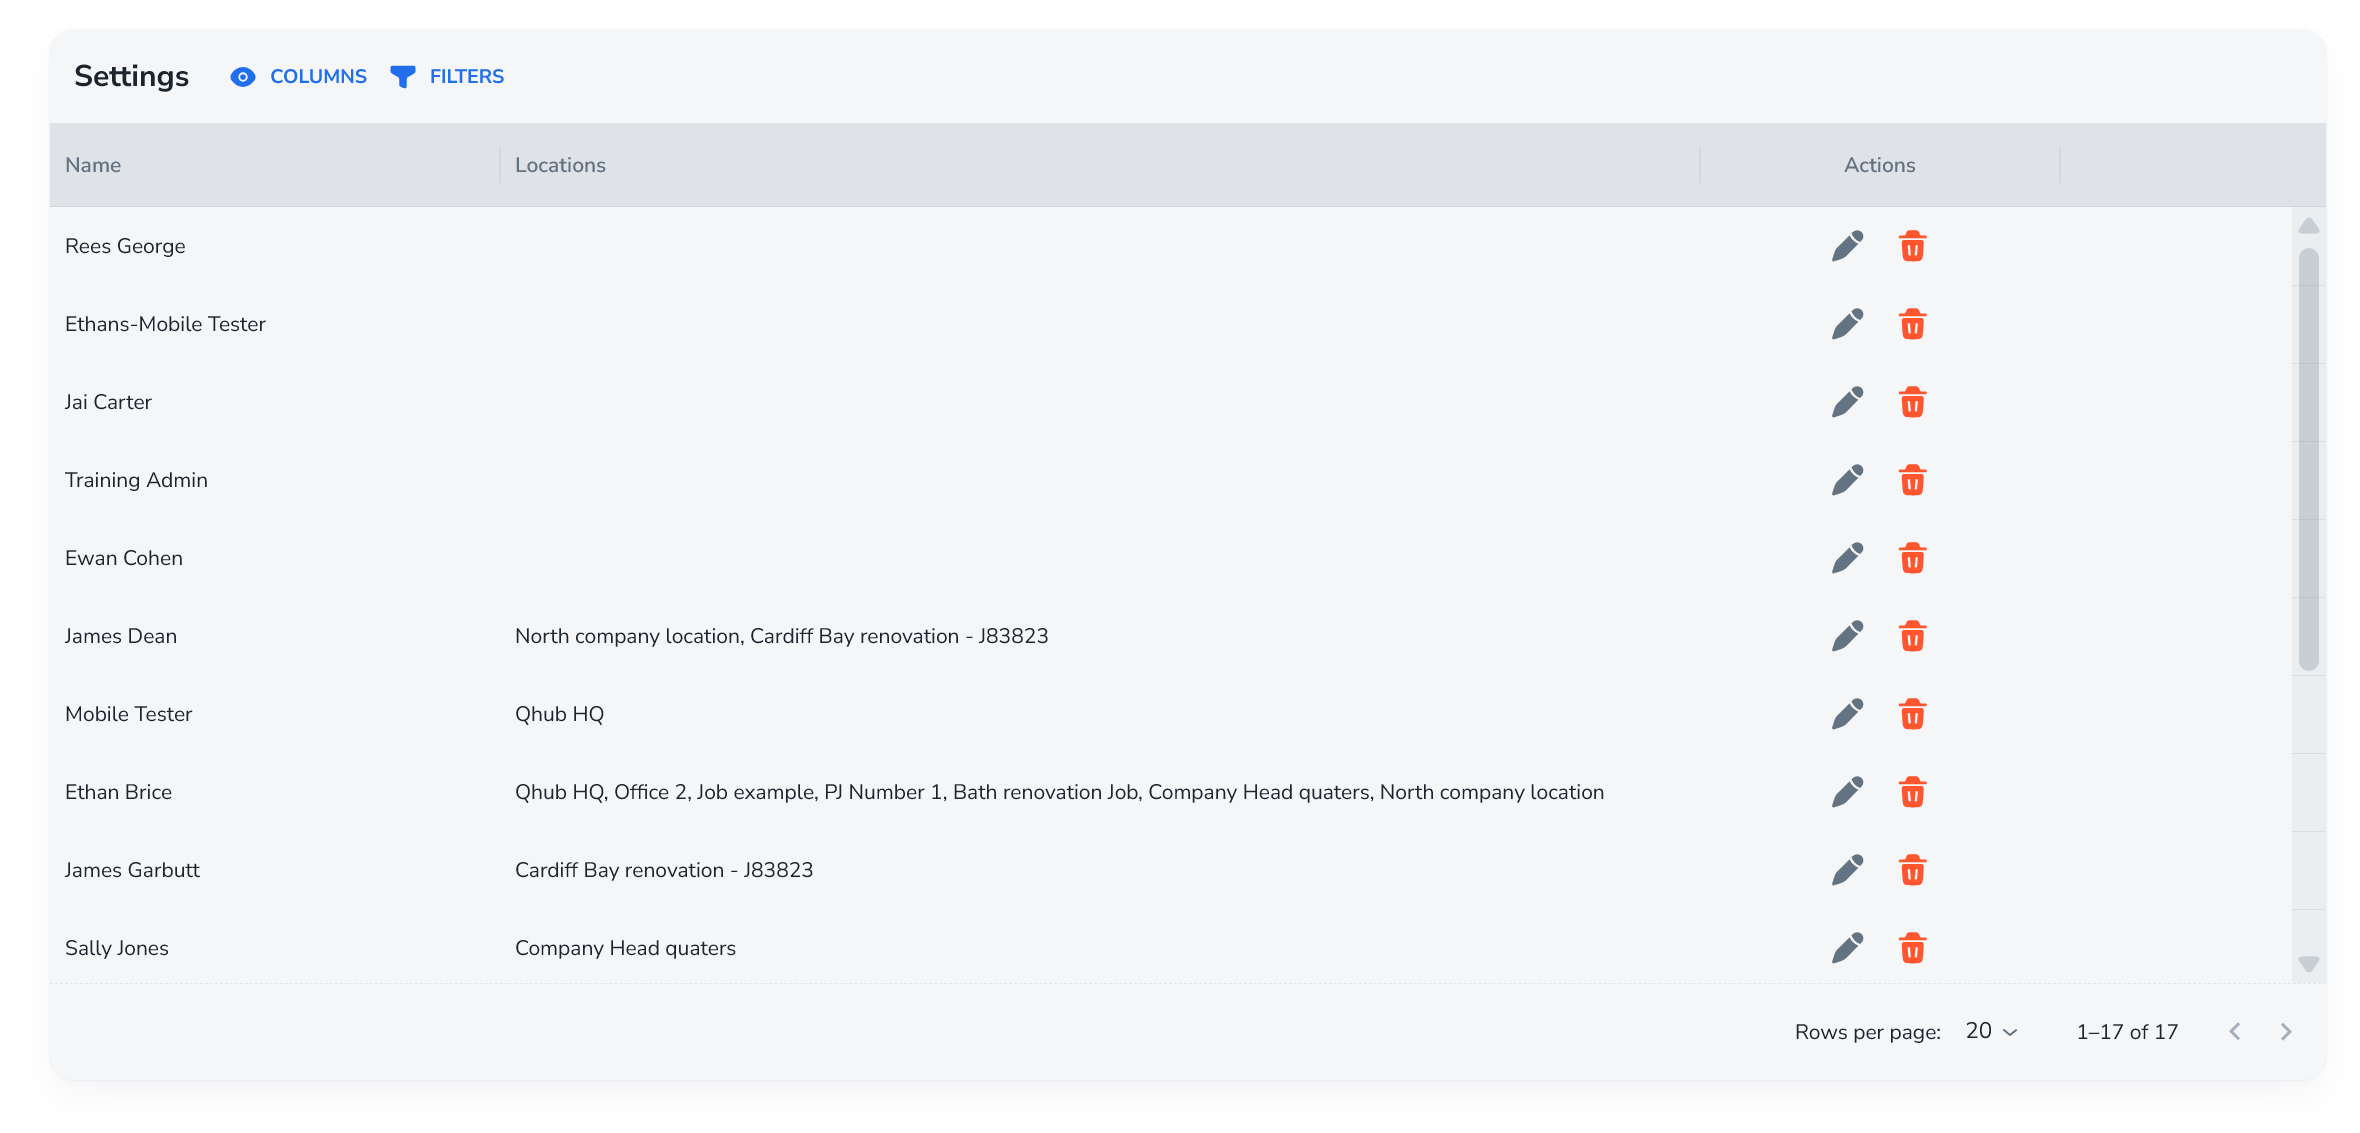
Settings – Managers
The Settings area shows:
All managers in Q-Hub (admins / paid users).
Which locations each person manages.
You can:
Add a new manager.
Assign them to specific locations as location managers.
This controls who can configure location details, forms, docs, and compliance at each site.
Use cases
Use case 1 – Project-based site management
Scenario:
A contractor has multiple projects at different client sites, each one lasting from a few months to several years.
How SISO helps:
Create a location per project.
Configure site-specific docs (client’s site rules, inductions, etc.).
Configure employee compliance activities (toolbox talks, RAMS read & understood, forms).
Use QR codes or a kiosk at the site entrance for all staff and visitors to sign in.
Use Reports and Compliance logs to show:
Who attended each project.
That they completed the required compliance steps for that site.
Use case 2 – External client premises with local rules
Scenario:
Your staff perform work on a client’s premises that has its own detailed site procedures.
How SISO helps:
On the project location, add site-specific docs for the client’s rules.
Set an expiry time (e.g. 90 days), so returning staff re-read after that period.
When staff sign in:
They are prompted to read and accept those documents.
Evidence of reading is stored in the logs and visible on their profile.
Use case 3 – Safety-critical sites needing roll call
Scenario:
A site needs clear emergency management, ensuring everyone currently on site gets urgent messages.
How SISO helps:
Staff and visitors sign in at the start (QR or kiosk).
In an emergency:
Use Roll Call → Emergency roll call.
The message is delivered via app/email/SMS (if configured).
Use Roll call history and delivery stats to confirm who received the message.
Access controls and visibility
Admins
Have access to all locations.
Can configure all settings, compliance, and documents.
Location managers
Assigned via Settings → Managers or on individual locations.
Can manage that location’s:
Details
QR and kiosk
Forms
Site docs
Employee compliance activities.
Users / attendees
May be full Q-Hub users, or just visitors.
Identified via email or phone number.
Can sign in via:
QR (recommended for visitors)
Kiosk
Potentially app/self-service depending on configuration.
Archiving locations
Archiving a location:
Removes it from KPIs and main lists.
Moves it to an Archived locations section.
Does not delete or hide user logs – all attendance remains fully traceable.
Best Practices
Use QR codes for visitors.
QR works well for ad-hoc visitors and contractors.
Kiosk mode is ideal for fixed entry points with regular traffic or where people do not have access to personal phones connected to the internet.
Keep forms simple by default
Start with just name + email/phone.
Add extra fields (company, who they’re visiting, picture) only where there is a clear need.
Separate site docs from core compliance where appropriate
Use site-specific docs for external or location-only rules.
Use Employee compliance activities for core internal compliance that should live in Q-Hub’s main records.
Use global compliance packs for standardised processes
E.g. a global “H&S Pack” that applies to all locations ensures consistency.
Use local packs where a site has extra requirements.
Be clear on expiry settings
Long-term static documents: maybe set to Never.
Frequently changing site rules: set to 90 days / 1 year so people must re-read periodically.
Always save kiosk credentials and PIN securely
Save when generated.
Control who has access—this is effectively the key to your site entrance system.
Export regularly if you need time calculations
Since SISO doesn’t calculate hours, export to CSV and apply your own formulas in Excel if you need time totals.
Troubleshooting
Issue: “SISO isn’t calculating total hours worked.”
Possible causes:
SISO currently does not have an hours-worked calculation feature.
Solutions:
Use Reports or People → See logs to export check-in/check-out data to CSV.
Calculate hours in an external tool (e.g. Excel).
Issue: “Users can’t check in remotely.”
Possible causes:
Remote check-in is not enabled for that location.
Geofence is enabled and they are outside the geofence radius.
Solutions:
Edit the Location:
Ensure “Enable remote check-in” is turned on if remote sign-ins are required.
Or, if geofence is required, confirm the radius and explain to users they must be physically on site to check in.
Issue: “Visitors say they never received the roll call message.”
Possible causes:
Missing or incorrect email/phone details for those visitors.
Messaging channel (e.g. SMS) not fully set up.
Solutions:
Check Roll call history to see which recipients were marked as Delivered / Not delivered.
Verify that:
Correct contact details were captured at sign-in.
Any optional channels (e.g. SMS) are configured if needed.
Issue: “People are not being asked to re-read site documents after changes.”
Possible causes:
Expiry is set to Never.
The document was only edited outside SISO, not replaced in the site docs area.
Solutions:
Check the expiry setting for site docs and adjust if periodic re-reading is required.
If the document has changed:
Use the “Replace” option on the site docs table.
This will force all users to re-read all site docs next time they sign in.
Issue: “Location disappeared from KPIs.”
Possible causes:
The location has been archived.
Solutions:
Go to Archived locations.
If needed, unarchive the location to restore it to main KPIs and lists.
Remember: user logs remain intact regardless.
Frequently Asked Questions
Q: Is SISO a time and attendance / HR system?
A: No. SISO is designed for site location management and compliance, not for HR or payroll. It records sign-ins/outs and compliance activity but does not automatically calculate hours or handle HR processes.
Q: Can SISO calculate total hours between sign-in and sign-out?
A: No. At present, users export data to Excel/CSV and do their own time calculations. The system was not designed as a time-tracking tool, although custom additions could be developed separately.
Q: Does SISO integrate with Q-Hub’s Read & Understood and forms?
A: Yes. For employee compliance activities:
Read & Understood actions in SISO update the main Read & Understood logs in Q-Hub.
Form completions via SISO appear as form entries in Q-Hub.
If a user has already completed a specific Read & Understood or form in Q-Hub, SISO recognises this and does not ask them again, unless configured otherwise (e.g. via time-based rules).
Q: Can I use SISO for a normal office?
A: You could, but SISO is primarily aimed at project and site-based work, especially where each site has its own documents and compliance needs. For general office sign-in, simpler solutions might be enough unless you specifically need per-site compliance evidence.
Q: What happens to logs when I archive a location?
A: Archiving a location:
Removes that location from active KPIs and main views.
Moves it into an Archive section.
Does not hide or delete user logs – all historical sign-ins/outs stay fully traceable.
Q: What’s the difference between site-specific documents and employee compliance activities?
Site-specific documents:
Only for that location.
Do not appear in main Q-Hub compliance.
Used for things like client site rules where you just need evidence they were shown/read.
Employee compliance activities:
Tie into main Q-Hub compliance (Read & Understood, forms).
Count towards an employee’s overall compliance record, not just that site.
Explore the Q-Hub platform
Ready to try it? Get started